
Wine Cellar Cooling Installation Gone Wrong:
How We Fix Bad Installs
A homeowner called us after their newly installed wine cellar cooling system never reached temperature. Their previous contractor had walked away from a job that simply didn’t work. We documented what we found, what we re-did, and how the system runs now. If you’re searching for “wine cellar cooling installer near me” or “fix wine cellar cooling system,” this is the kind of work that separates a finished install from a working install.
This is one of the more common calls we get on the wine cellar side of our business: a homeowner pays a general contractor or a non-specialist HVAC company to install a wine cellar cooling system, the install “finishes,” the techs leave, and the cellar never holds temperature. Sometimes it cools partway and stops. Sometimes it never starts at all. Either way, the homeowner is now paying twice — once for the original work, again to have it diagnosed and corrected.
This walkthrough is one of those calls. The equipment is a WhisperKOOL CellarCool split system — outdoor condenser at the side of the house, evaporator in the attic above the cellar, line set running between them. The unit was new. The installation was not done by an authorized wine cellar cooling specialist, and once we arrived, the reasons it wasn’t working were straightforward to identify.
What follows is the documentation, photo by photo, of what we found and what we corrected. The point of the article isn’t to criticize anyone — it’s to show what a proper wine cellar cooling installation actually looks like, what the failure modes are when one of those steps gets skipped, and what to look for when hiring an installer for your own cellar.
Wine Cellar Cooling Isn’t Generic HVAC
The reason most wine cellar installs go sideways is simple: a wine cellar cooling system is purpose-built refrigeration, not air conditioning. It runs at a much lower setpoint (55°F vs. 72°F), holds humidity at 60–70%, and has tighter tolerances than residential HVAC equipment. Every step that’s “close enough” on a regular AC install becomes a failure on a wine cellar install:
- Refrigerant charge accuracy — AC systems can absorb a few percent of error. Wine cellar units cannot.
- Sealed-system cleanliness — any moisture or contamination affects long-term reliability dramatically more.
- TXV setup — wine cellar evaporators run at colder coil temperatures and need their thermostatic expansion valve dialed in within a narrow window.
- Vibration isolation — cellars are quiet rooms. Anything transmitted through the structure becomes audible.
- Line set integrity — on residential AC, a slow leak shows up as poor cooling weeks later. On a wine cellar unit running continuously, it shows up as never reaching setpoint.
The technical demands are closer to commercial refrigeration than residential HVAC. That’s why both California licenses matter on these jobs — the C-20 (HVAC) license alone doesn’t cover what’s actually involved. We hold both C-20 and C-38 (Refrigeration) under CSLB #1127709, plus authorized service status with WhisperKOOL.
“The Cellar Won’t Cool Down”
The homeowner’s description was direct: a contractor had recently installed a brand-new WhisperKOOL CellarCool system in their cellar. The system would run, but the cellar wasn’t cooling. They’d gone back to the original contractor twice. The third visit didn’t happen. They booked us for an independent diagnostic.
On a new install that doesn’t cool, there’s a short list of likely causes — refrigerant undercharge or overcharge, a TXV adjustment that was never done, line set issues introduced during installation, an evaporator install error in the attic, or an electrical problem. The diagnostic question is which one. Often the answer is “more than one of the above.”
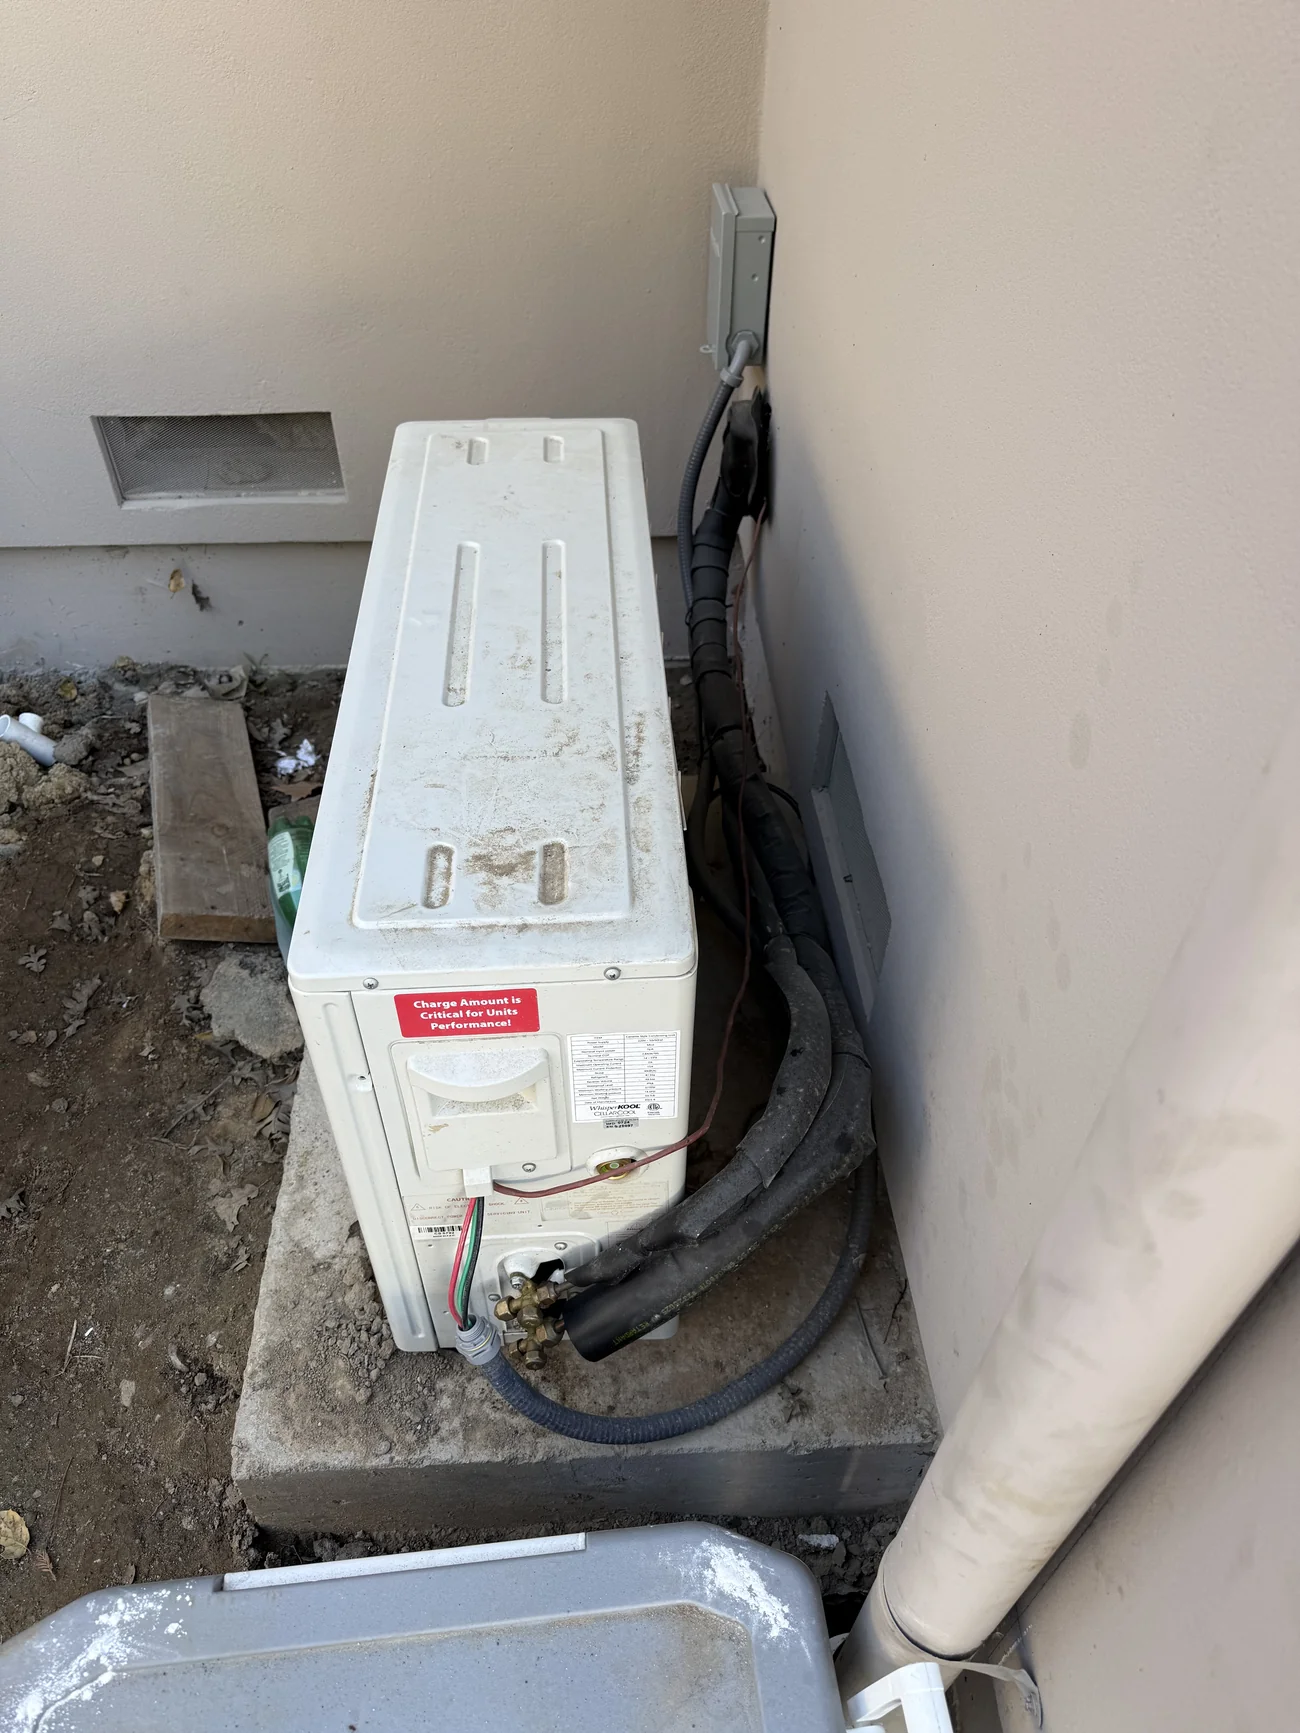
The Diagnostic Walk-Through
A standard diagnostic on a non-cooling new install starts at the outdoor unit and works inward toward the evaporator. Visual inspection first, electrical second, refrigerant readings third, and only after all three do we open anything up. Here’s what each step revealed.
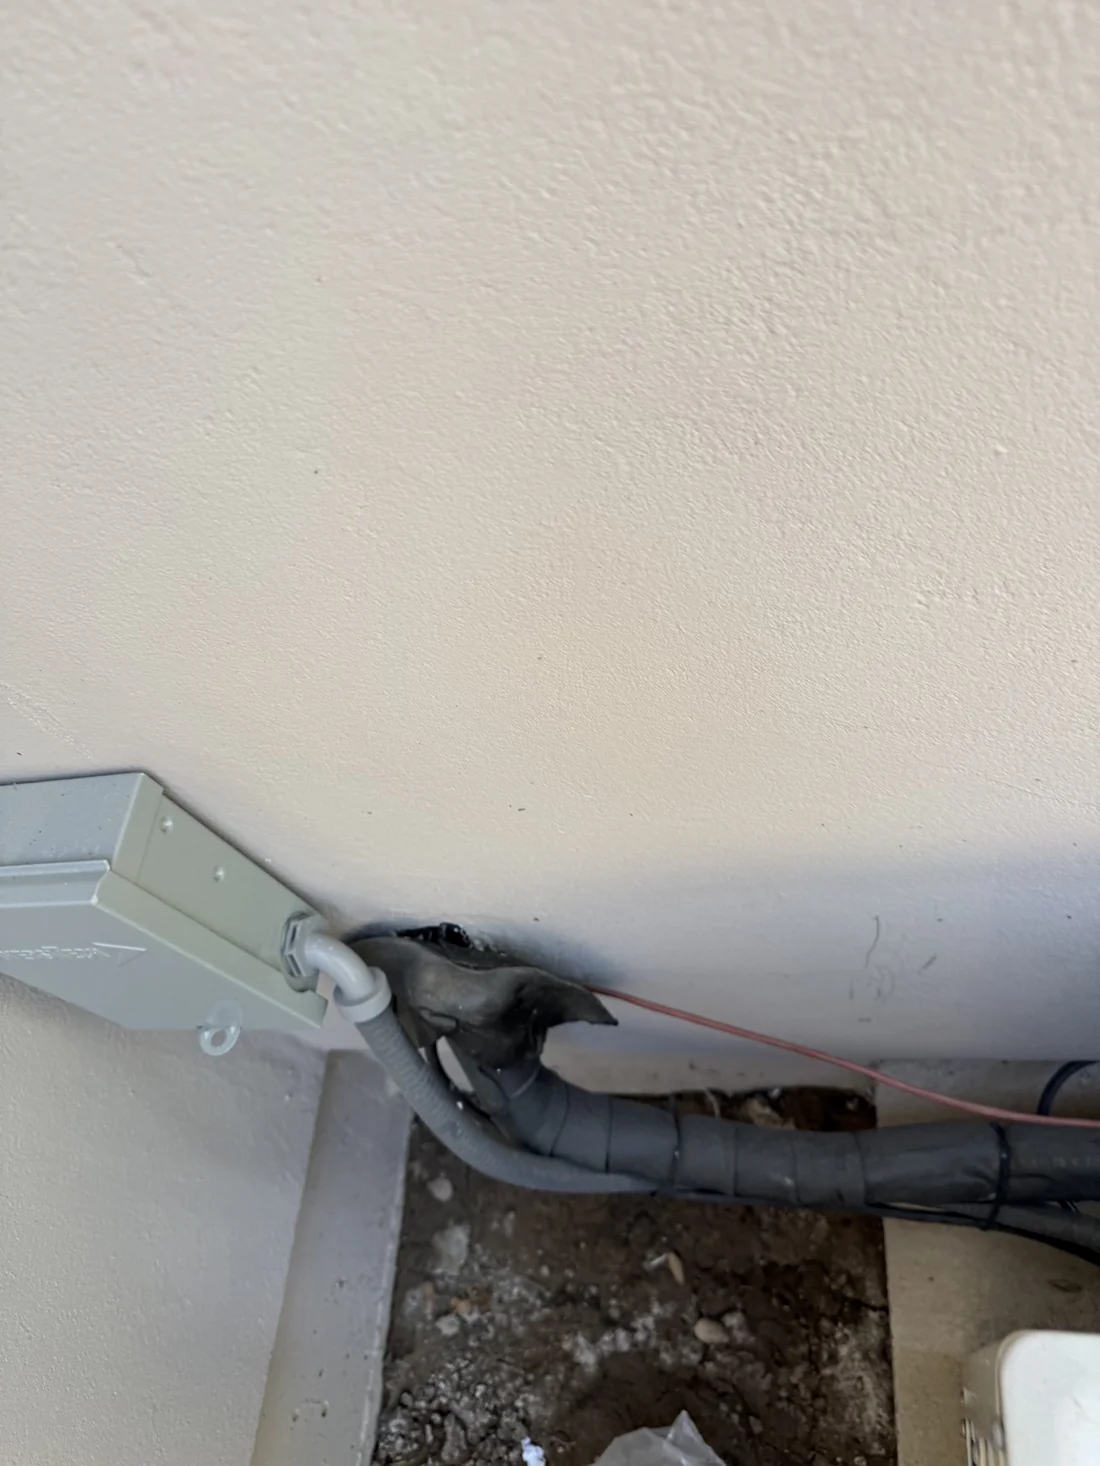
Outdoor unit and line set entry
The wall penetration where the line set enters the building was open and damaged. The factory-supplied line set insulation had been cut back too far, leaving bare copper and exposed wiring at the entry point. There was no proper grommet or sealant to weatherproof the penetration. This is a building envelope issue as well as a refrigeration issue — uninsulated copper at the entry point sweats heavily, and any moisture entering the wall cavity becomes a problem over time.
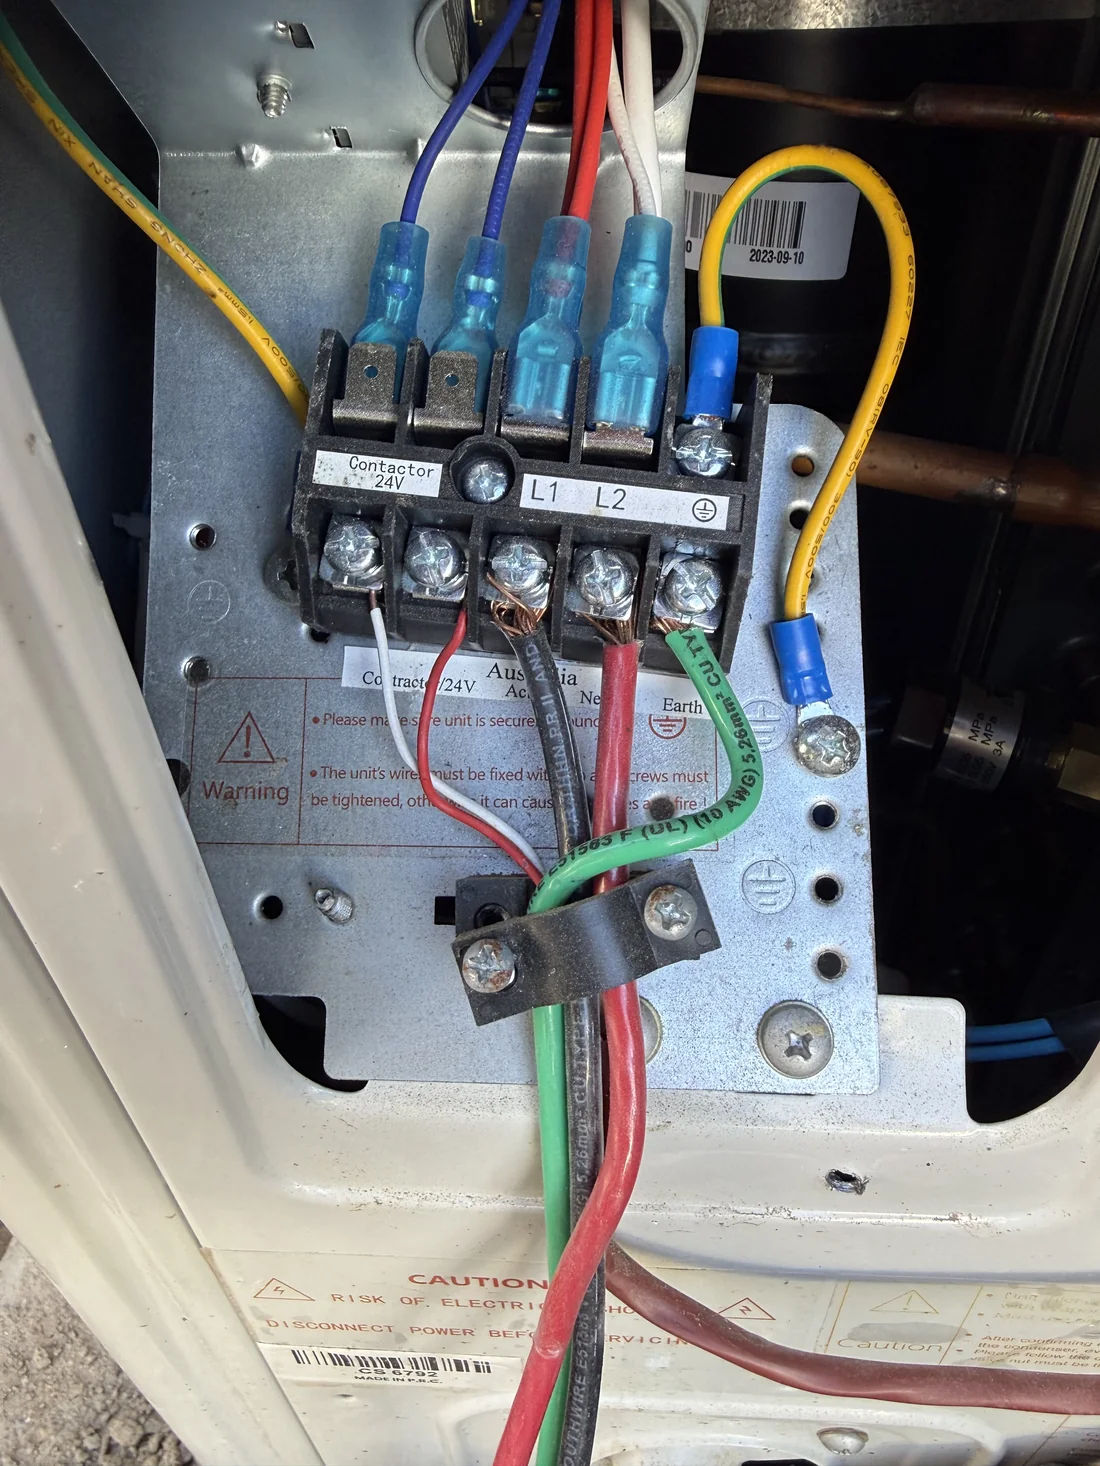
Outdoor unit mounting and electrical
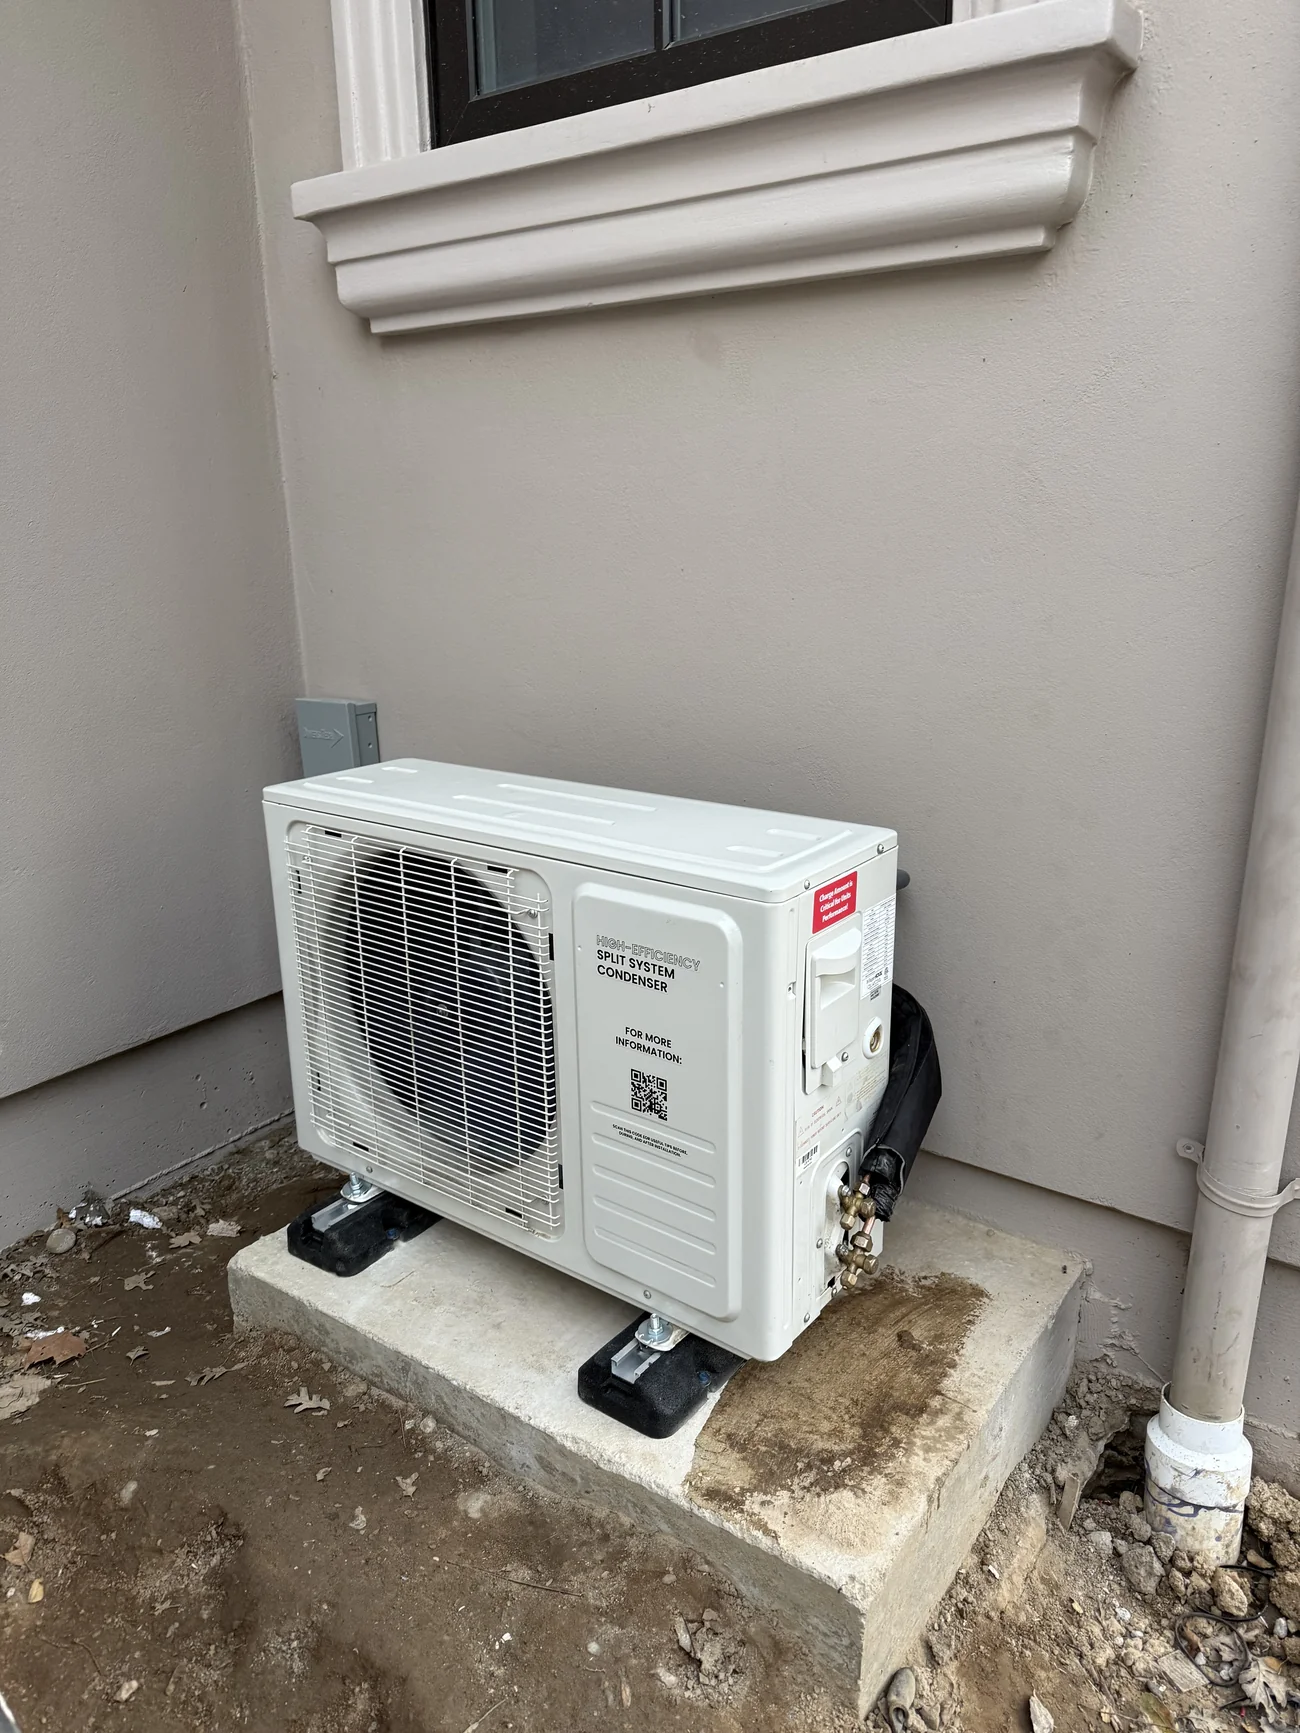
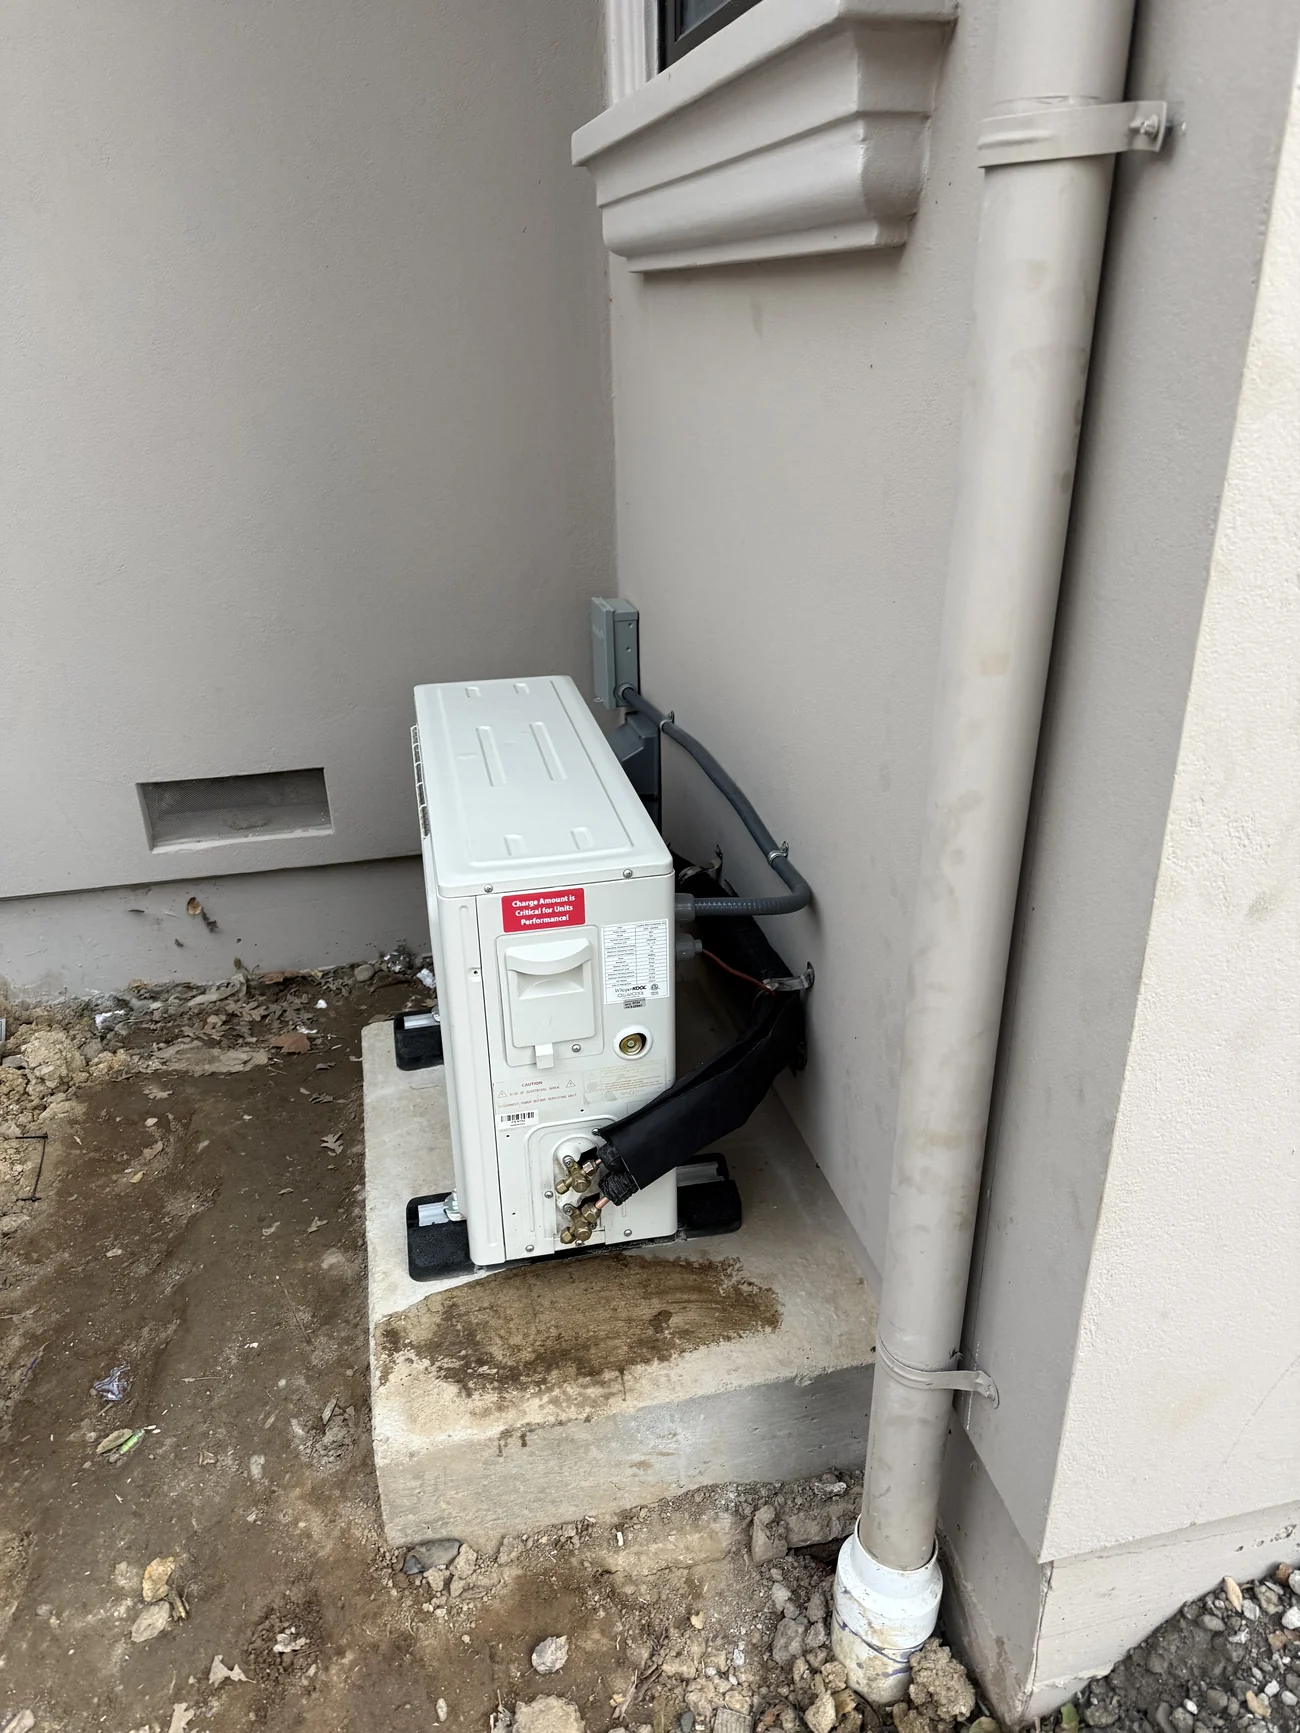
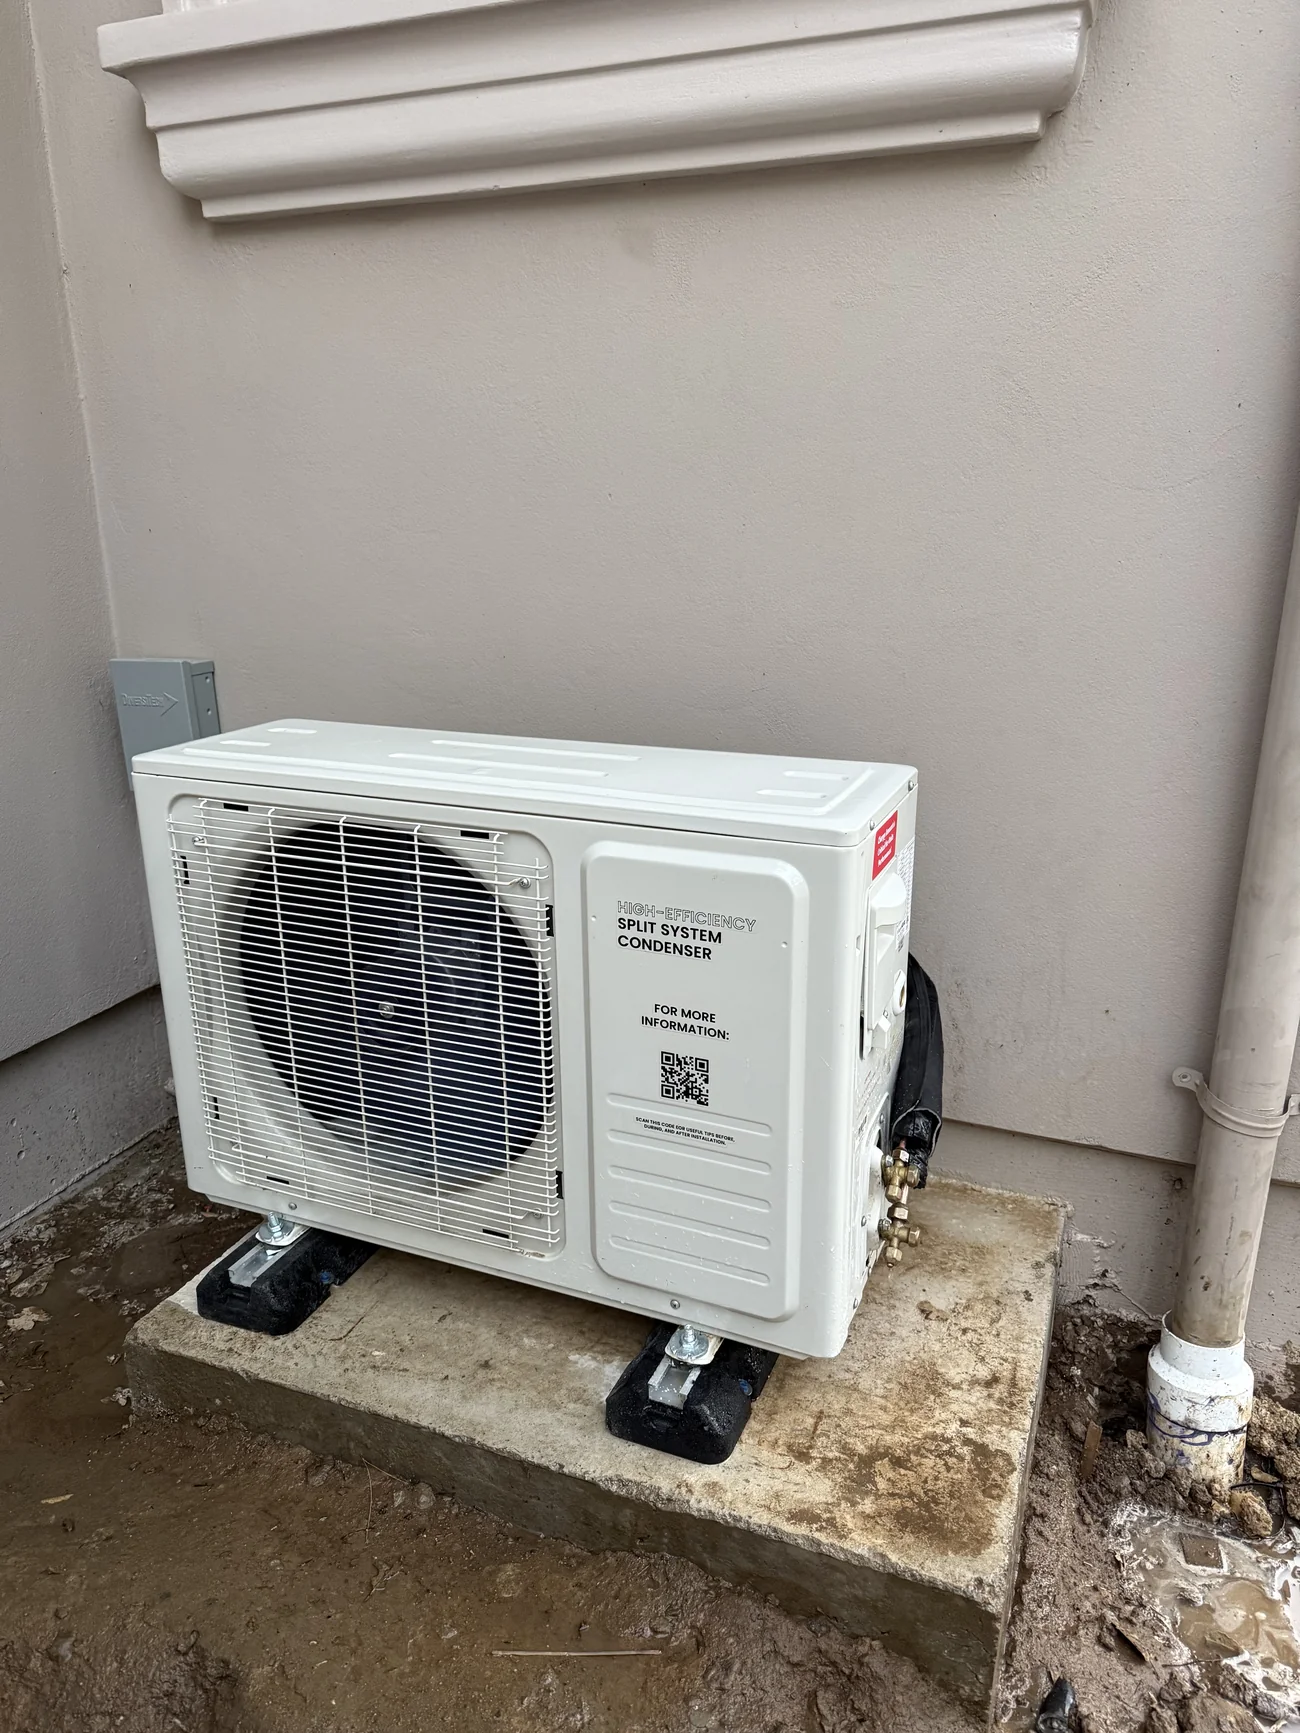
The condenser was set on a concrete pad without vibration isolation feet. On a residential AC unit, that’s often acceptable. On a wine cellar unit installed against the wall of a quiet space, vibration transmits through the slab and into the wall — you hear it inside the cellar. The electrical disconnect was mounted but the conduit run into the unit was unsupported and at an awkward angle. Inside the unit’s electrical compartment, the contactor and L1/L2 terminals showed correct connections, but several of the spade connectors weren’t fully seated and one of the wire crimps showed signs of being redone in the field.
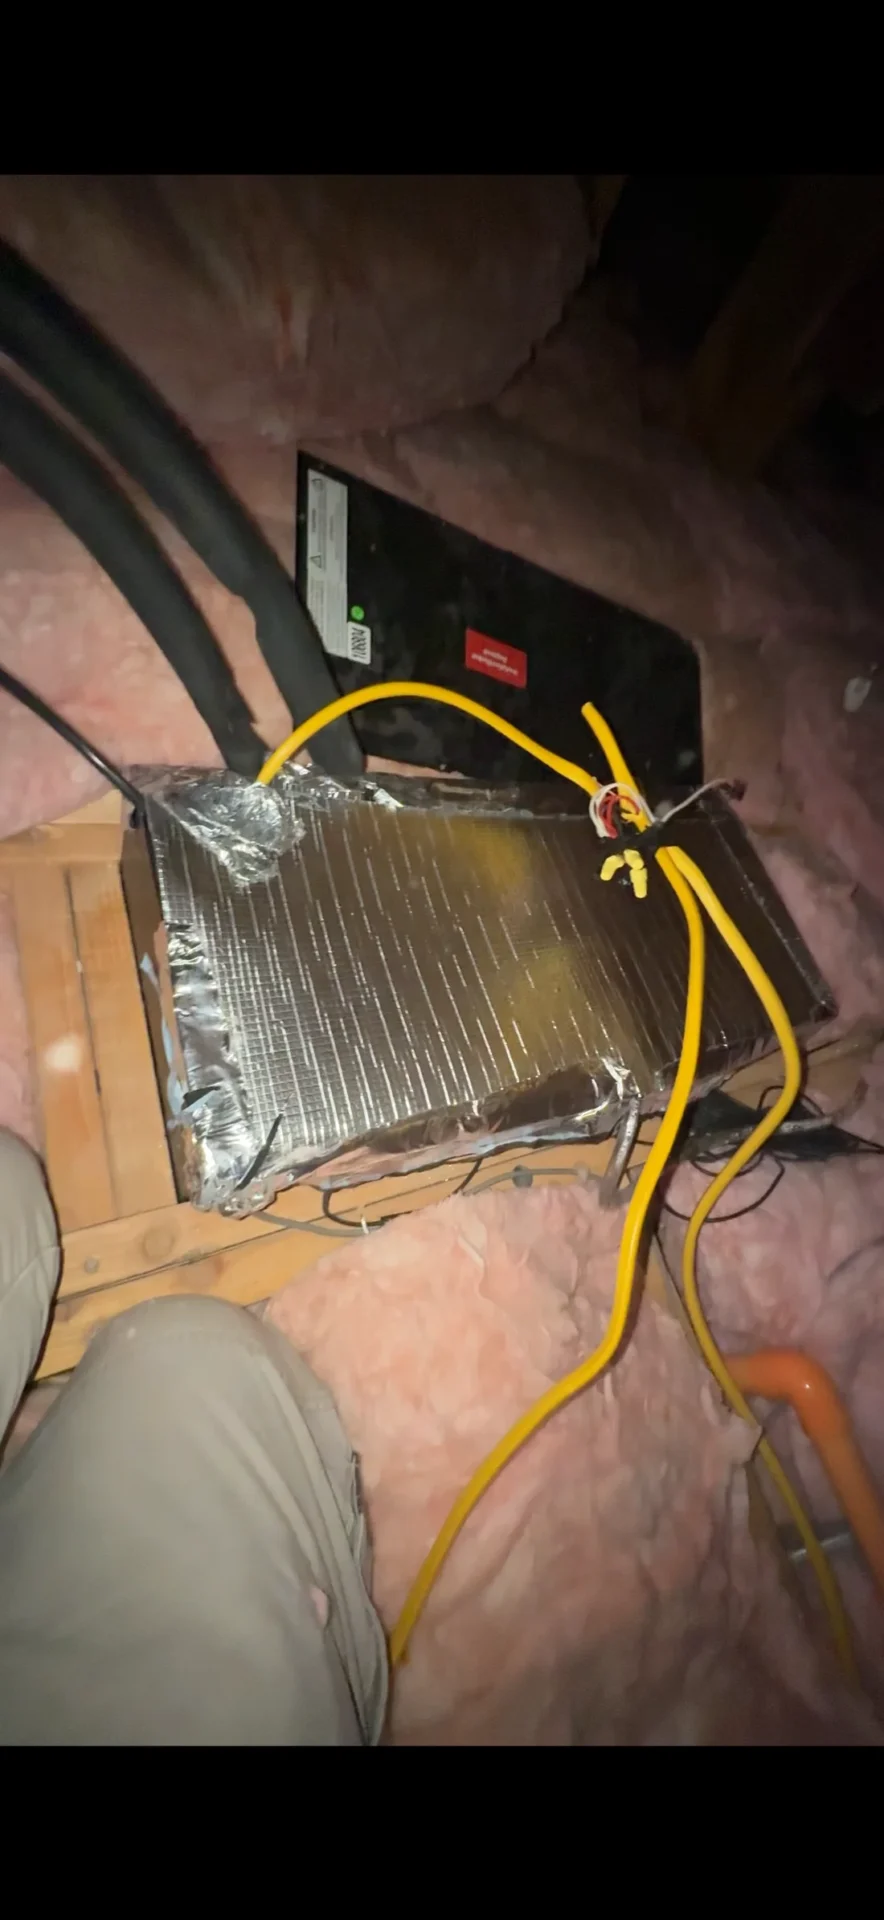
Evaporator in the attic
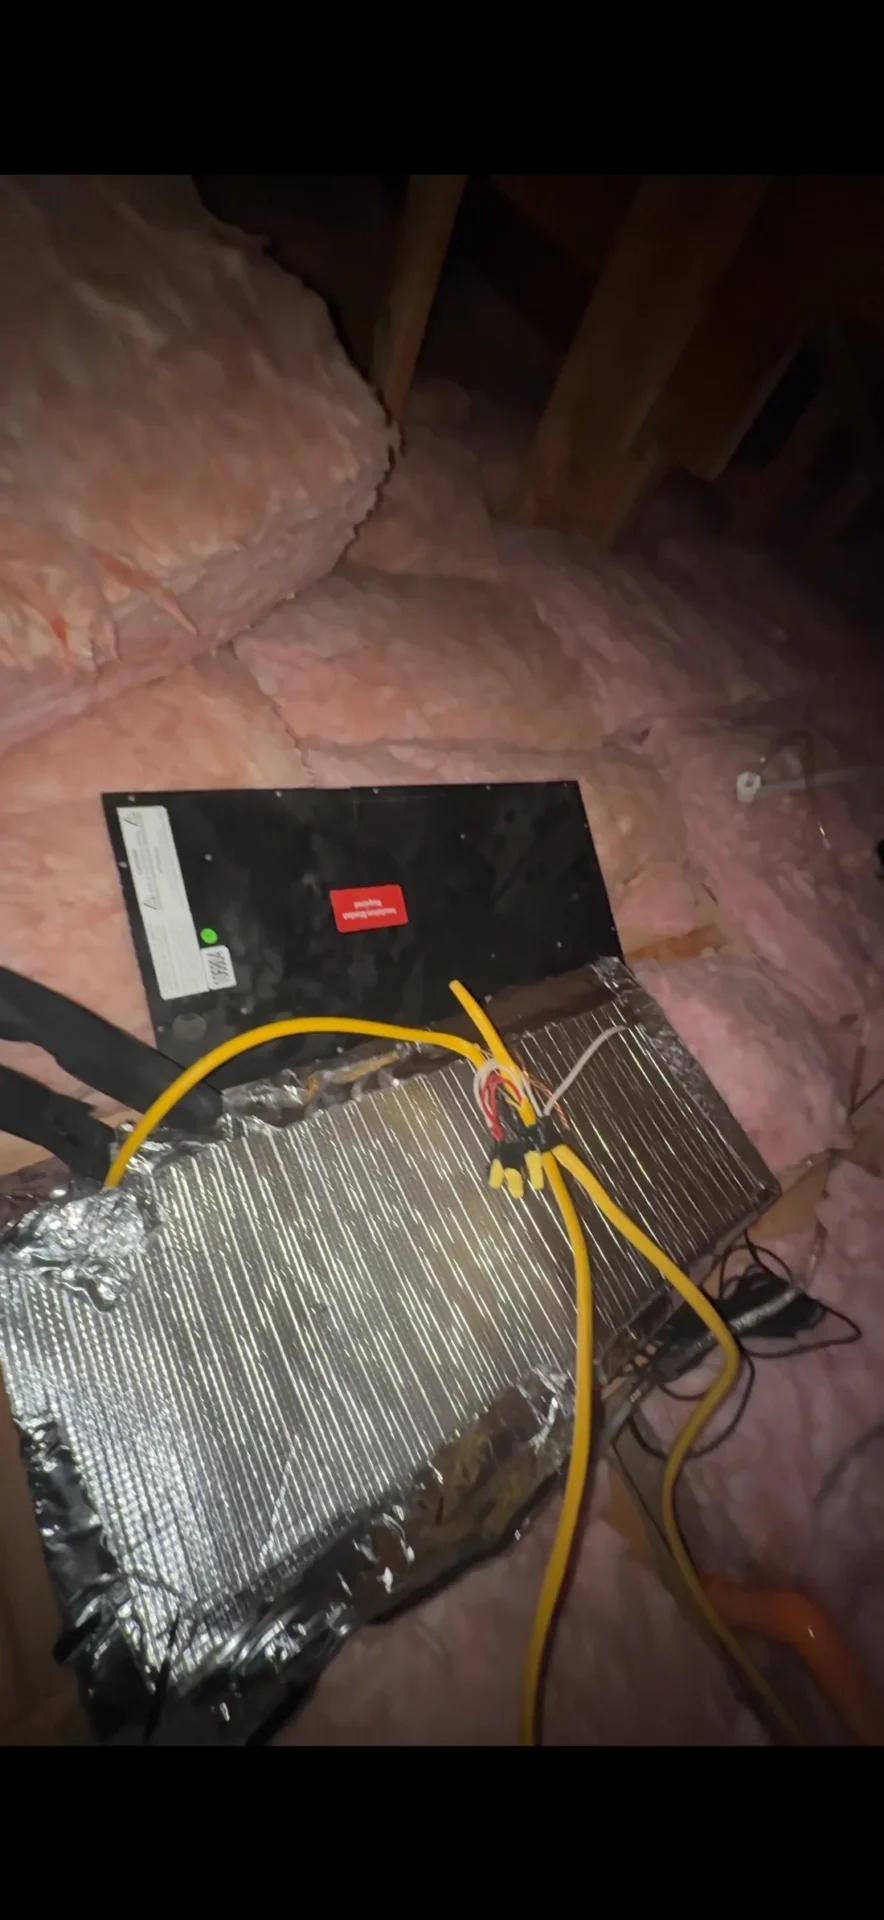
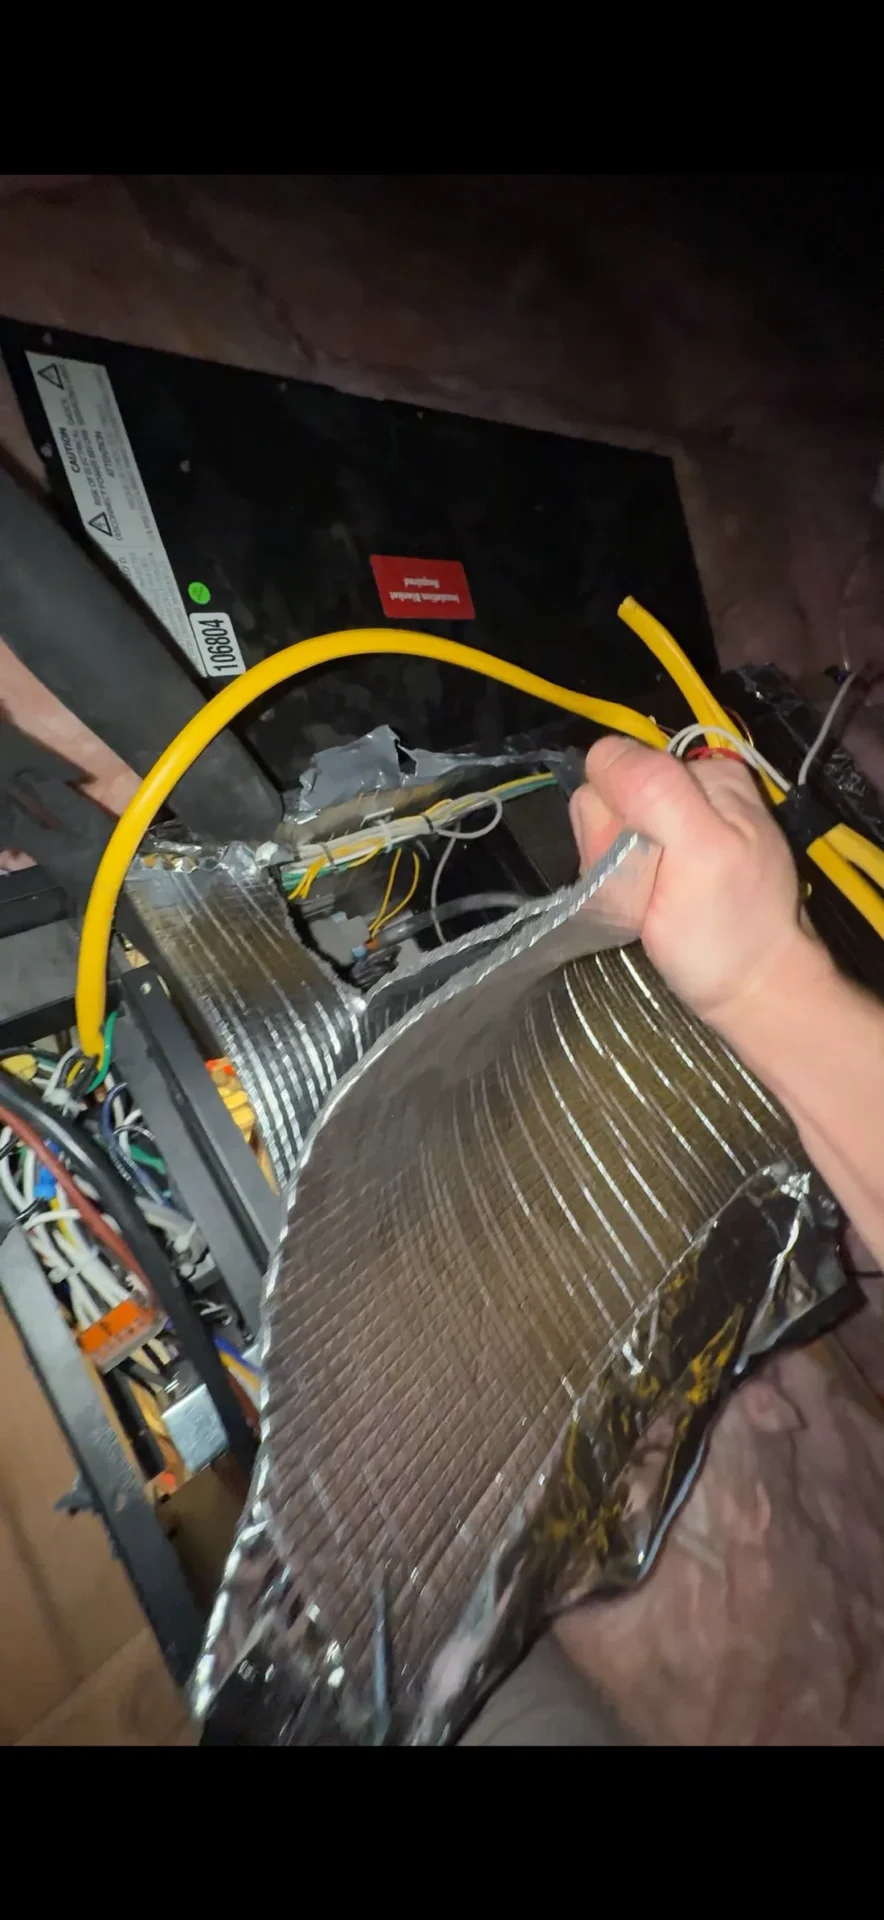
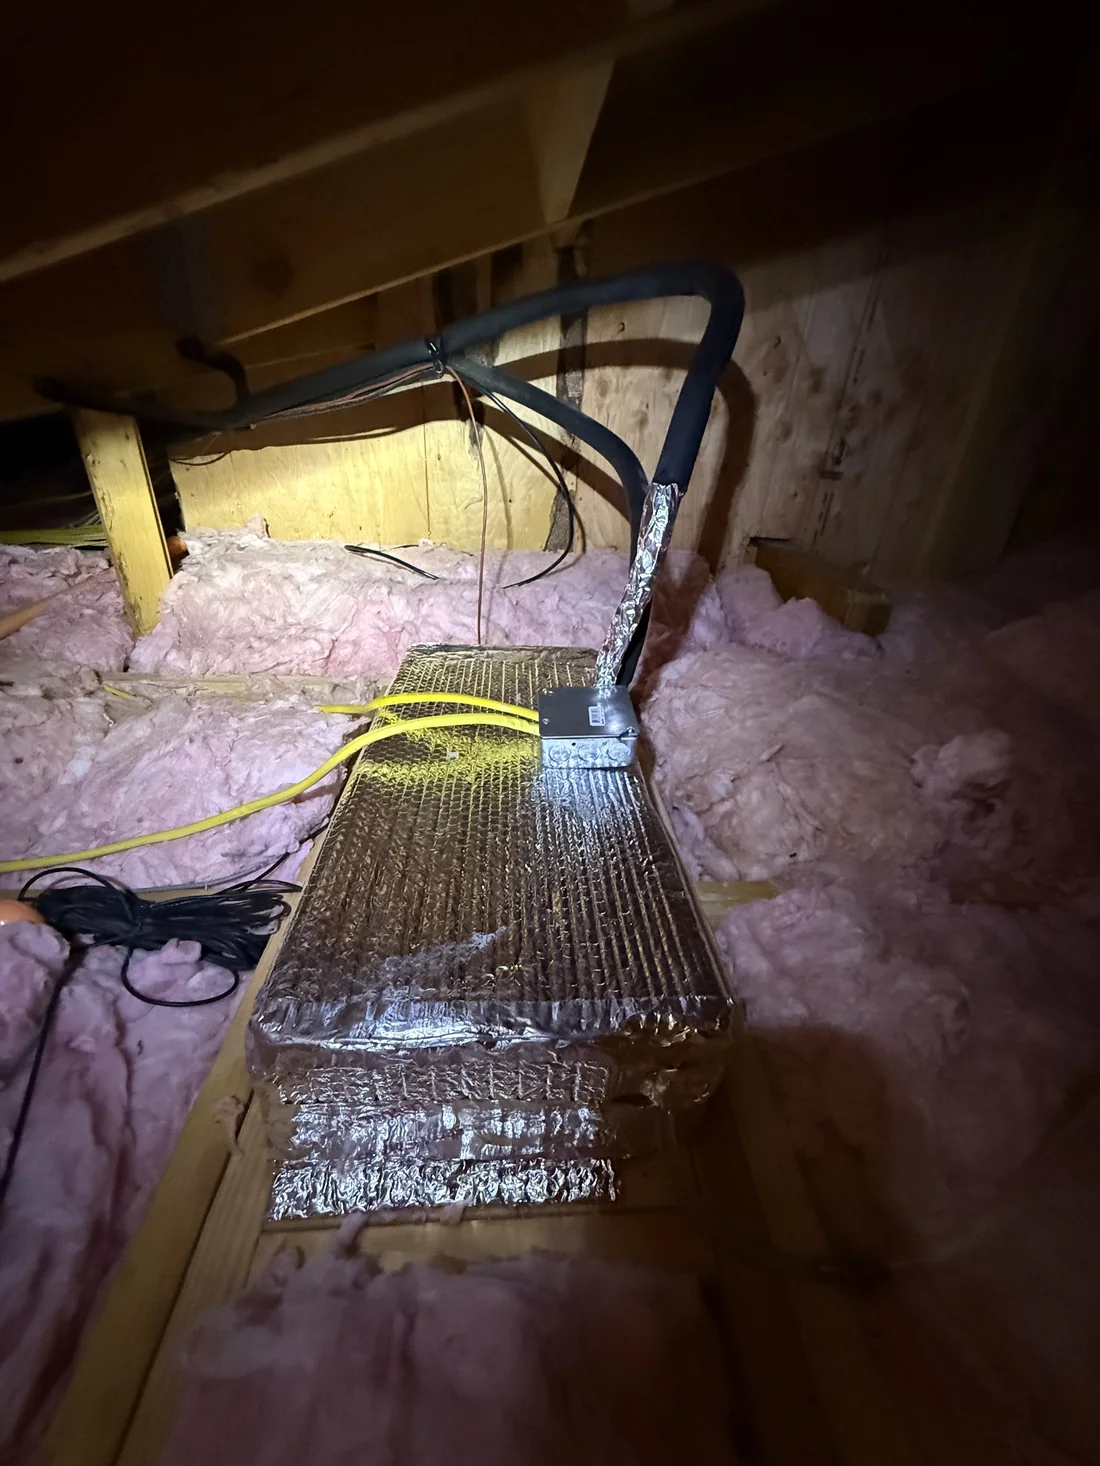
The evaporator in the attic was where the most significant issues were. The unit’s access cover was loose — not bolted in place. The supply duct connection wasn’t properly sealed to the cellar penetration. Low-voltage wiring was running across the attic floor without protection or strain relief. Most importantly, the unit had been partially disassembled (or never fully assembled) — we found internal components accessible and electrical connections inside the cabinet that should have been completed at install. The factory-installed insulation around the cabinet had been removed during installation and not put back.
Refrigerant charge and pressures
With the unit running, suction and head pressures both read outside the manufacturer’s expected range for the ambient conditions. Superheat at the evaporator outlet was high — consistent with either an undercharge or a TXV that hadn’t been adjusted from its factory shipping setting. Subcooling at the condenser outlet was low, also consistent with undercharge.
The diagnostic was now clear: the system had multiple compounding problems — mechanical assembly issues, line set integrity, and a refrigerant charge that didn’t match the equipment. None of these could be fixed individually because each affected the others. The honest assessment was that the system needed to be taken apart, the line set re-checked end to end, the evaporator properly assembled, the system re-evacuated, and recharged correctly from scratch.
We presented the homeowner with two options: a band-aid attempt at a top-up that probably wouldn’t hold, or a complete rework. They chose the rework.
Step by Step, Done Right
Step 1 — Recover refrigerant
Before any sealed-system work, all refrigerant in the system gets recovered into a certified cylinder per EPA Section 608. Recovered weight is logged on the work order. This is non-negotiable on any wine cellar cooling repair — it’s also the cleanest way to remove contaminated charge before the rework.
Step 2 — Line set inspection — kink discovered, decision to replace
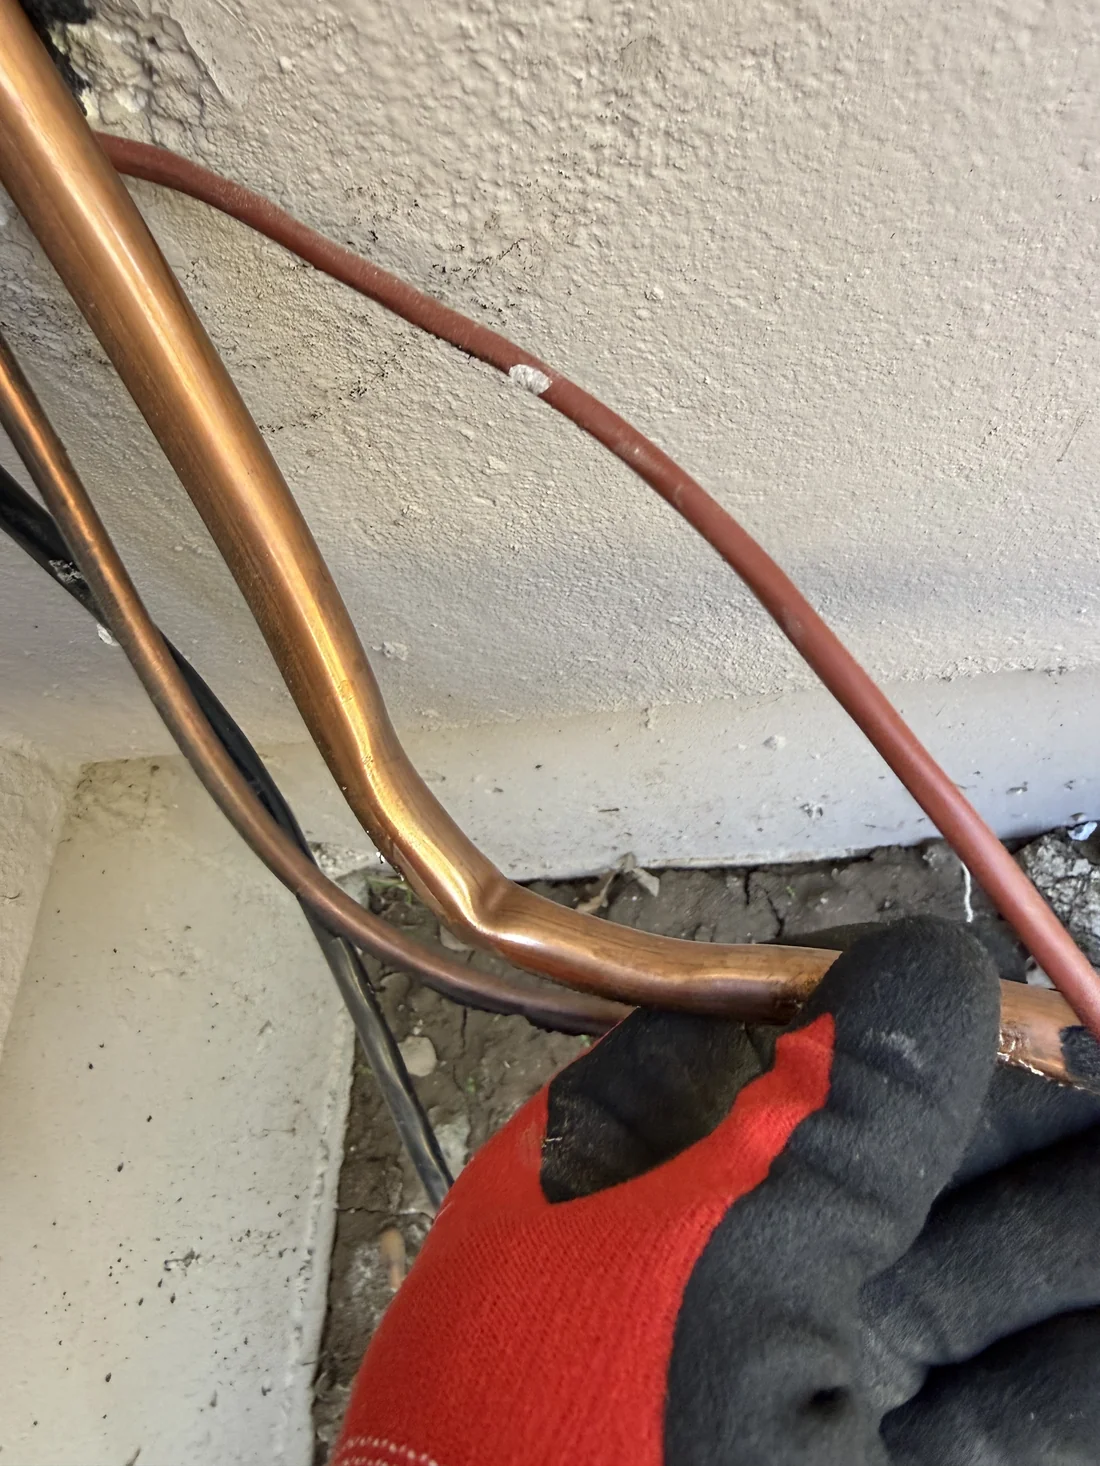
With the system at zero pressure, we removed the line set insulation along the full run between the outdoor and indoor units to inspect the copper tubing. What we found made the decision for us: the suction line had been kinked during the original install. A kink restricts refrigerant flow at that point, raises pressure on the upstream side of the restriction, and creates a long-term failure point that will eventually crack and leak. There’s no “straightening it back out” on a kinked refrigerant line — the copper is permanently work-hardened at that bend and needs to be cut out.
After the inspection we presented the homeowner with a clear scope: the line set was beyond field repair, and the right move was to cut it out completely and run a new properly-sized, properly-formed line set from the outdoor unit to the evaporator. They approved the additional scope.
Step 3 — Outdoor unit removed, line set cut out, prep for new copper
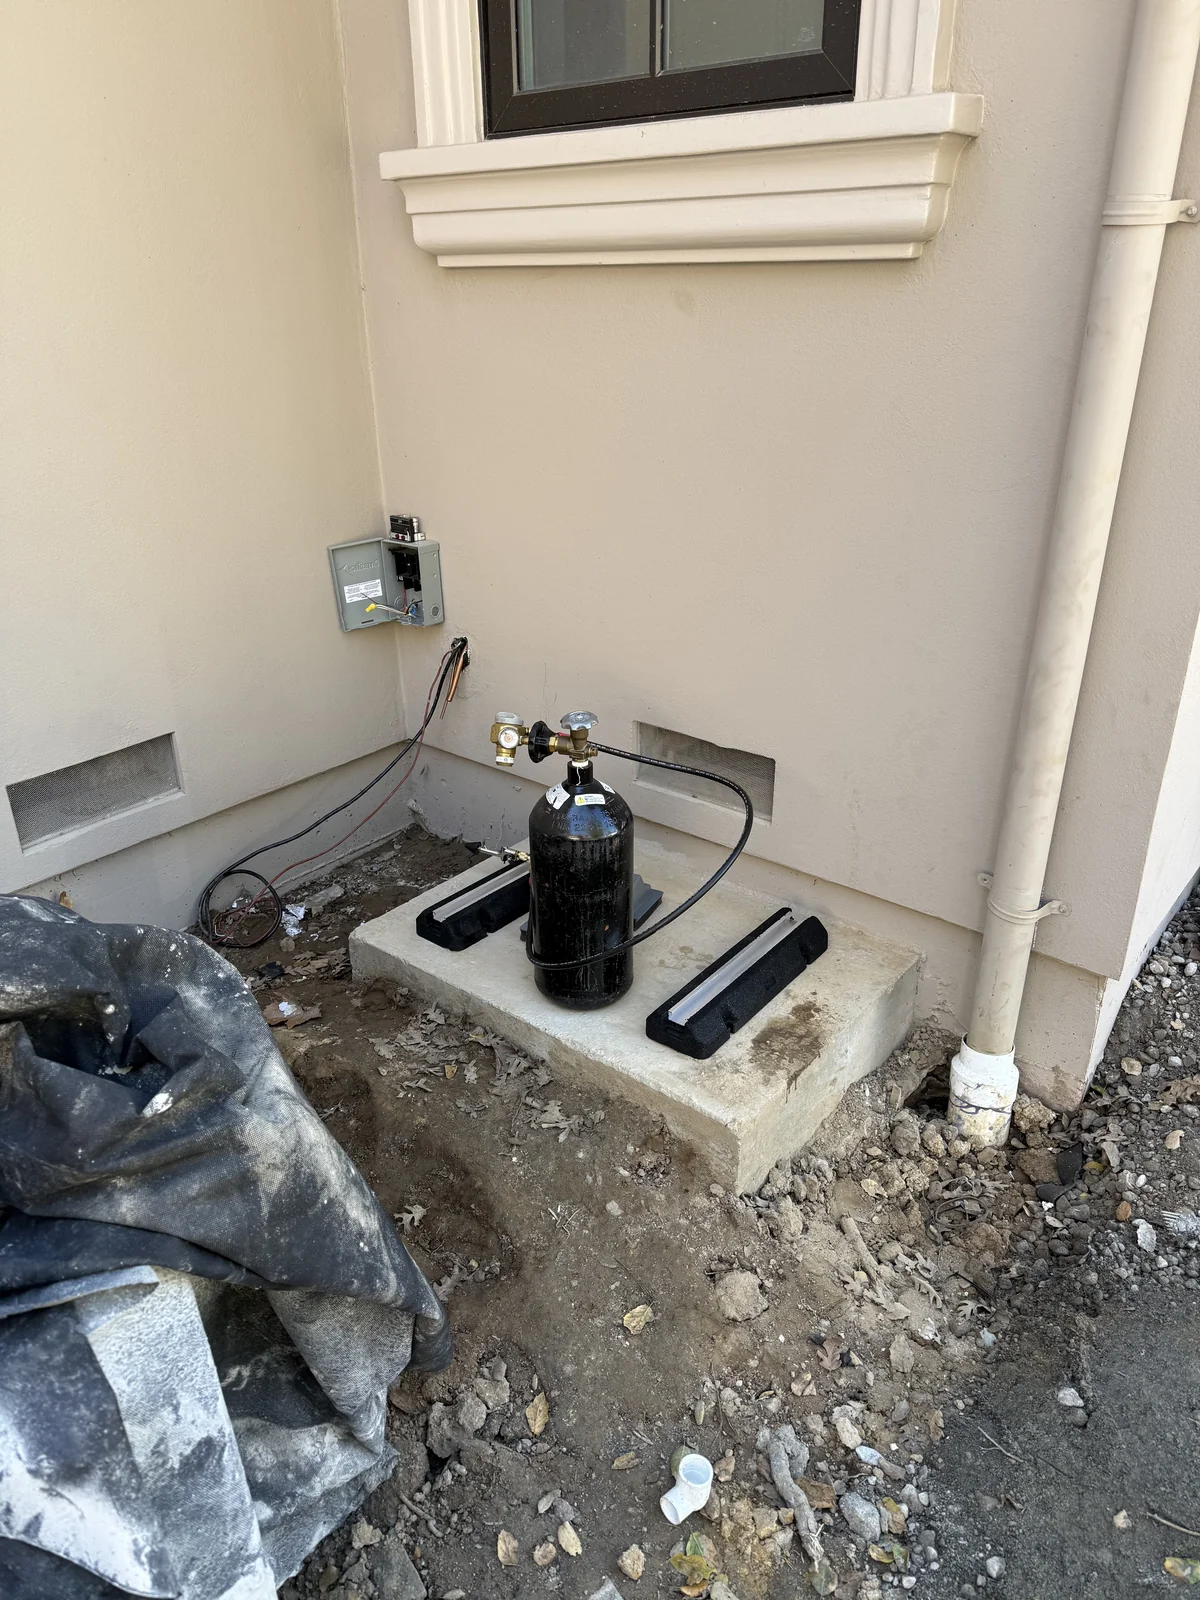
With the decision made, we lifted the outdoor condenser off its pad, set new vibration isolation pads under each corner position, and cut out the original line set entirely. The new copper would be sized correctly for the run length, properly insulated end-to-end, and brazed with dry nitrogen flowing through the tubing on every joint to prevent internal oxide scale. While the outdoor unit was off, we also pre-positioned a fresh nitrogen cylinder for the pressure-purge step that would follow once the new line set was brazed in.
Step 4 — New line set brazed in with dry nitrogen
New copper was cut to length, deburred, and brazed at every joint. Dry nitrogen flows through the inside of the tubing during brazing — this is the single most important detail on any sealed-system rework. Without nitrogen flowing, the heat oxidizes the inside of the copper and creates black carbon scale, which then washes downstream into the new TXV and clogs it within weeks of running. With nitrogen flowing, the inside of the copper stays bright and clean. Every braze on this line set was done that way.
Step 5 — Evaporator reinstalled and finalized in attic
The attic evaporator was fully removed, re-mounted on its platform, the cabinet was reassembled with all factory hardware in place, and the new line set was connected. Factory cabinet insulation was replaced and wrapped with foil tape to seal the joints. Low-voltage wiring was rerouted through the cabinet’s designed wire pathway with proper strain relief. The condensate drain line was checked and routed with proper slope.
Step 6 — Outdoor unit reset on vibration pads, new electrical disconnect
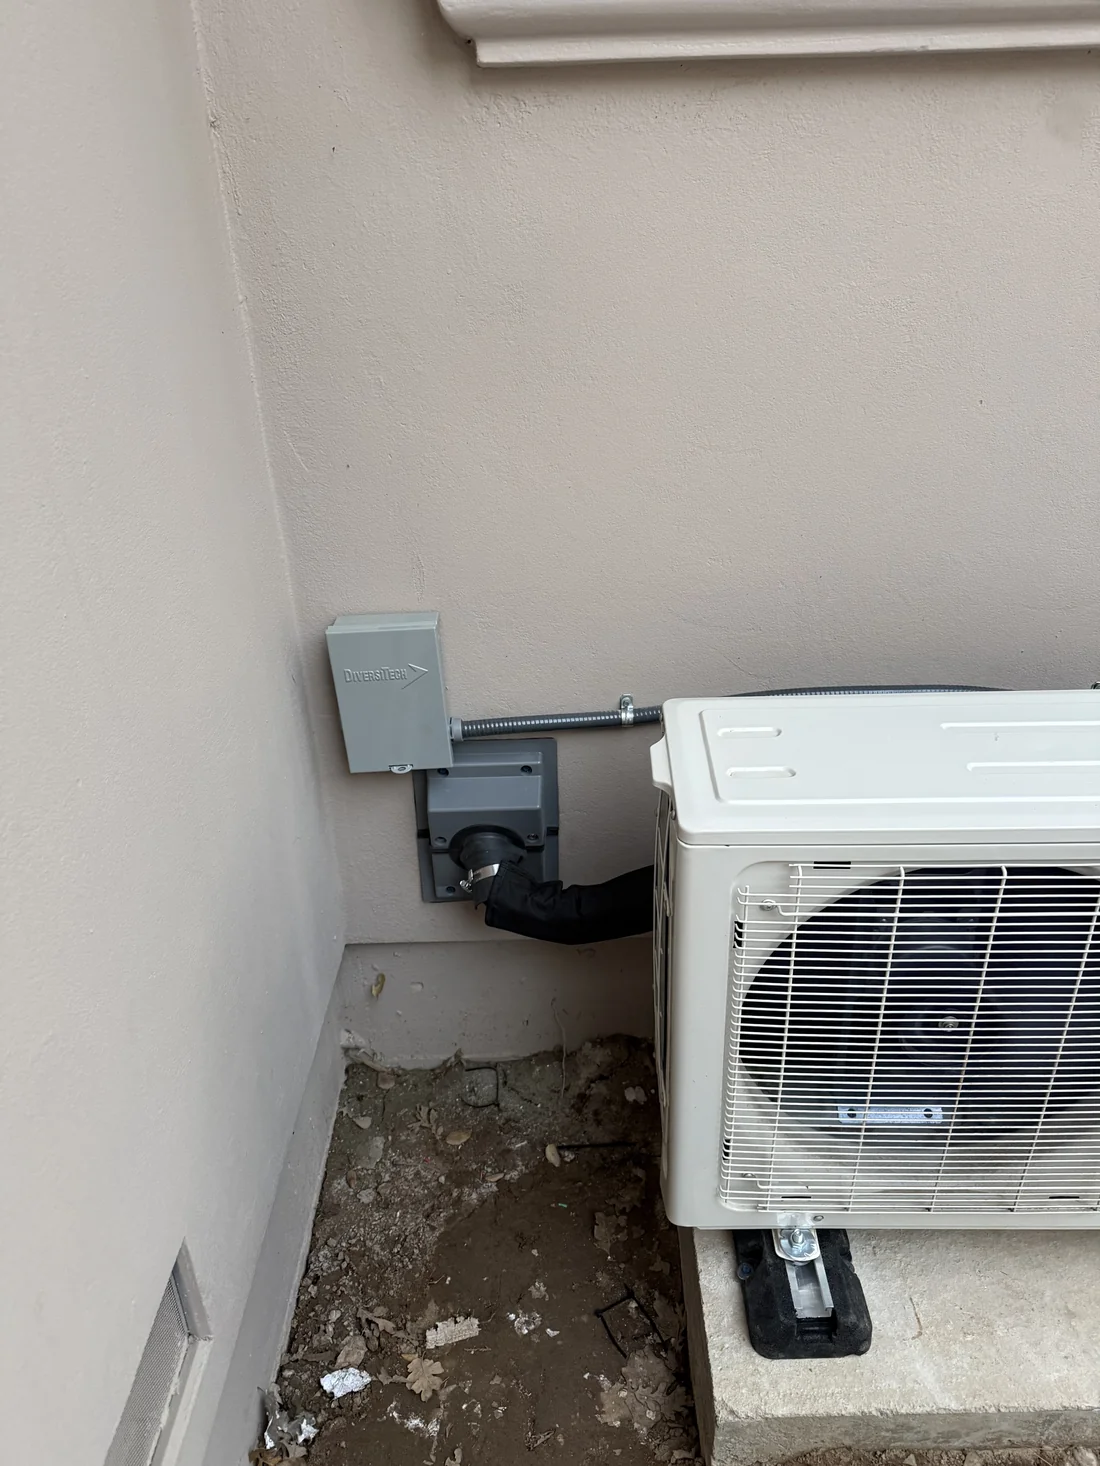
The outdoor condenser was set back down on the new vibration pads and bolted to the slab. The four pads decouple the cabinet from the concrete — without them, every cycle of the compressor transmits as low-frequency vibration through the slab, into the wall, and into the cellar above. With them, the cellar stays quiet. We also installed a new DiversiTech non-fused disconnect with proper conduit routing into the unit’s electrical compartment, correctly supported, correctly grounded, with strain relief at the entry point.
Step 7 — Nitrogen pressure test & deep vacuum
Before any refrigerant goes back into the new line set, we pressure-test with dry nitrogen and watch for any drop. Zero drop = no leaks at any of the new joints. Any drop, however small, gets traced and corrected before continuing. This is the single biggest skip on bad installs — it’s also the one that determines whether the repair holds for ten years or ten weeks.
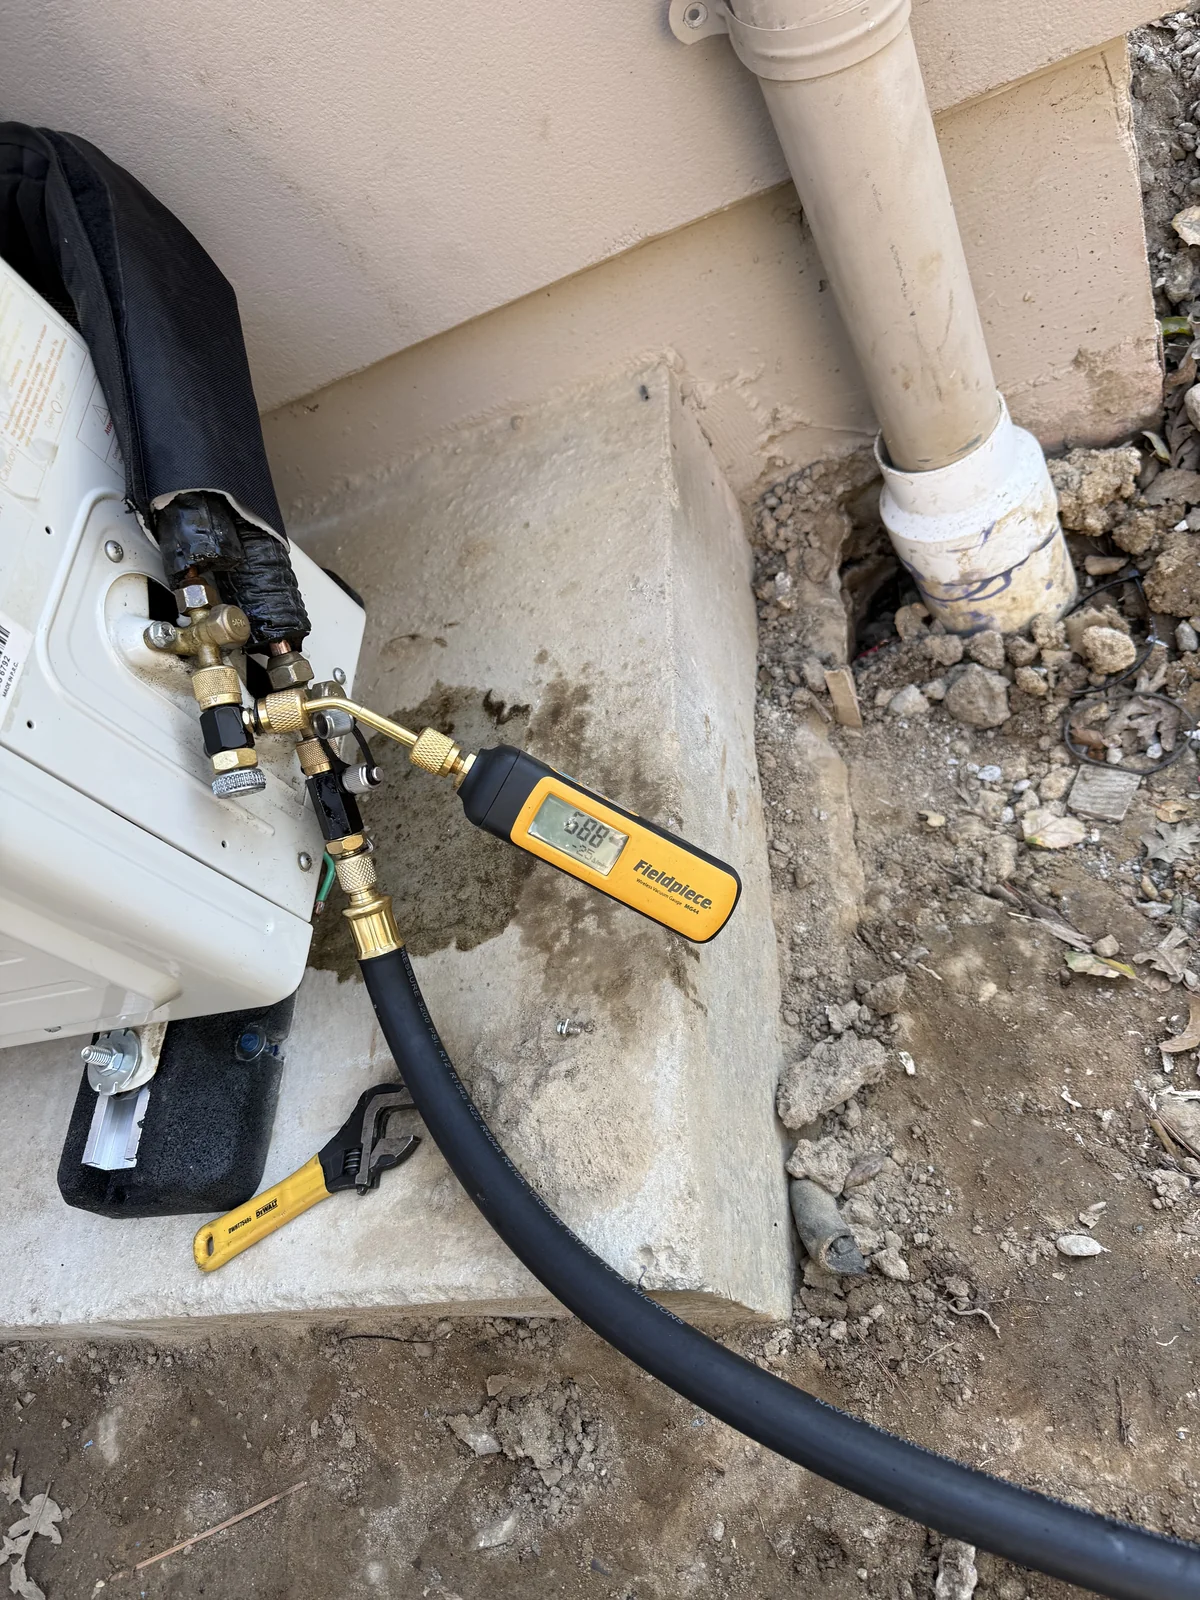
Once nitrogen confirms tightness, that nitrogen gets recovered and the system is pulled into a deep vacuum with a two-stage pump. The vacuum has two purposes: removing every trace of moisture from inside the system (water turns into acid in a running compressor over time), and confirming mechanical tightness one more time. We use a digital micron gauge isolated from the pump to verify the vacuum holds steady.
Step 8 — Charge by weight, TXV adjustment, commissioning
The system was charged by weight to the WhisperKOOL data plate specification using a digital refrigerant scale — not by pressure feel. With the unit running, we adjusted the TXV (thermostatic expansion valve) until superheat at the suction line came into the manufacturer’s published range. We then verified subcooling at the liquid line was also within spec. Both readings landed in their target windows after a single TXV adjustment, which is the sign of a properly assembled system that just needed the charge dialed in correctly.
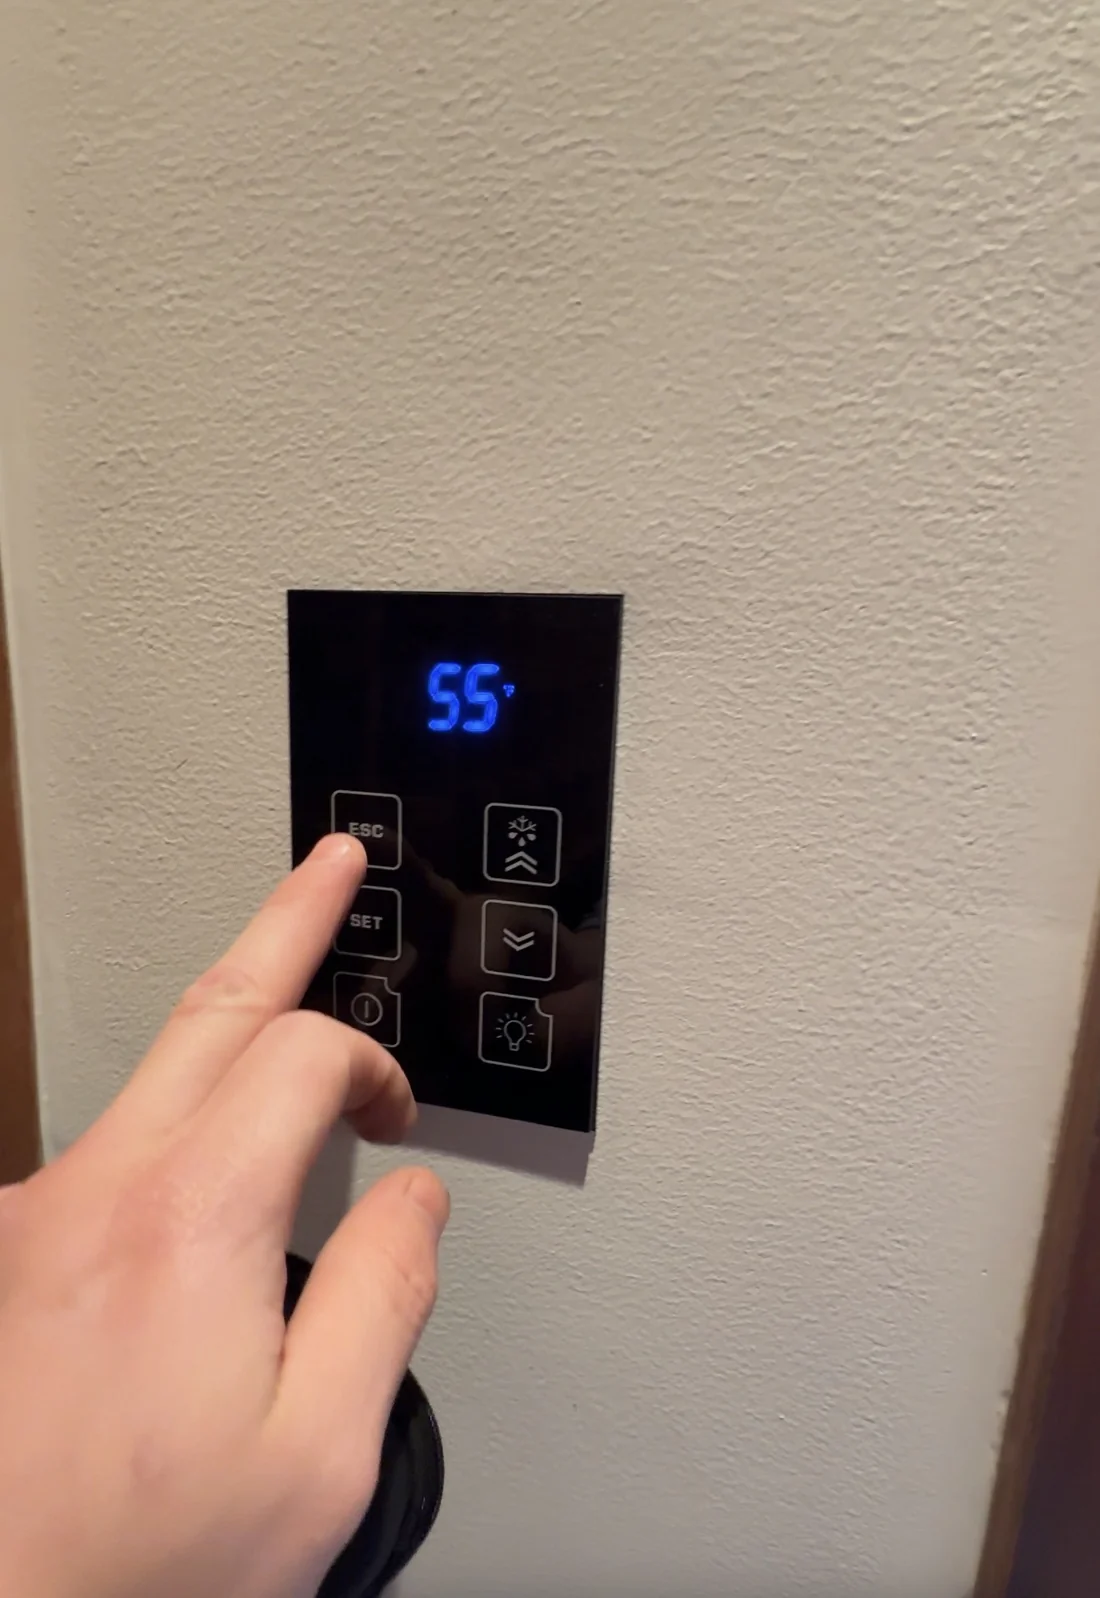
Commissioning included airflow verification at the supply, electrical draw at the compressor under load, and watching the cellar pull down to setpoint. From the time we connected the charge to the time the cellar hit 55°F was about 90 minutes — a healthy pull-down for the cellar size. Humidity stabilized in the correct range as the system reached steady-state cycling.
What to Verify Before You Hire
If you’re hiring someone to install wine cellar cooling, here are the questions worth asking up front — before any work happens. The answers tell you whether you’re getting a wine cellar installer or a generalist who’s about to learn on your project.
Refrigeration license, not just HVAC
In California, the C-38 (Refrigeration) license is a separate qualification from the C-20 (HVAC) license. Wine cellar cooling is refrigeration. Ask which licenses they hold.
Brand authorization
If they’re installing WhisperKOOL, are they an authorized service provider? If CellarPro, Wine Guardian, or another brand — same question. Authorized status means manufacturer training and parts access.
EPA 608 certification
Required by federal law to handle refrigerants. Universal certification covers all common refrigerants used in wine cellar systems.
Will pressure-test & vacuum the system
Ask directly: do they pressure-test with nitrogen and pull a deep vacuum before charging, with a digital micron gauge? If the answer is unclear, that’s your sign.
Charge by weight, not pressure-feel
Wine cellar units must be charged to the data plate weight using a digital scale. Charging “by feel” using gauge pressures alone produces inconsistent results across different ambient temperatures.
Documentation at handoff
A proper install ends with a documented service file: charge weight, vacuum readings, superheat & subcooling values, and photos. If you don’t get this, you can’t verify the work was done correctly.
What This Rework Included
For reference, here’s the full list of work performed on this rework. This is what a properly executed wine cellar cooling installation actually requires, in order:
- EPA-compliant refrigerant recovery with logged weight
- Line set inspection — kink discovered, line set deemed beyond field repair
- Complete line set removal & replacement — new copper sized correctly and run end-to-end
- Wall penetration repair — trimmed, sealed, and weatherproofed
- Evaporator reassembly in attic with proper internal hardware, insulation, and wire routing
- Outdoor unit lifted, vibration pads installed, unit reset and bolted
- New DiversiTech electrical disconnect with proper conduit routing
- Nitrogen-purged brazing on every joint of the new line set
- Nitrogen pressure test verified zero leaks
- Two-stage deep vacuum verified at 588 microns on calibrated digital gauge
- Refrigerant charge by weight per WhisperKOOL data plate
- TXV adjustment until superheat fell within manufacturer range
- Subcooling verification within manufacturer range
- Full commissioning with airflow, electrical draw, and pull-down to setpoint documented
The original install skipped or partially completed many of these steps. The rework took one full day on-site — longer than a clean install would have, because we were undoing prior work as well as doing the install correctly. The cellar held setpoint before we left and has been holding ever since.
We Stand Behind Every Job
1-Year Workmanship Warranty + OEM Manufacturer Warranty on Equipment
- Full year coverage on labor and workmanship
- OEM equipment warranty from WhisperKOOL on the cooling system
- Documented service file — readings, photos, charge weight
- Free callback if anything we touched needs adjustment
- Written quote before any work begins
- Licensed and insured — your home and collection both protected
Wine Cellar Cooling Installation — Common Questions
Or planning a new install?
WhisperKOOL Authorized · EPA 608 Certified · C-20 & C-38 licensed. Real diagnostics, honest assessment, and properly executed work. Serving Santa Clara, San Mateo & Santa Cruz counties.