WhisperKOOL Repair:
Wine Cellar Cooling Done Right
If your WhisperKOOL is warming up, leaking water, icing over, or just not cooling like it used to — you don’t want a generic HVAC tech learning on your collection. We’re a WhisperKOOL Authorized service provider with EPA 608 refrigeration certification, and we repair these systems every week across the Bay Area. Here’s what proper WhisperKOOL repair actually looks like — start to finish, photo by photo.
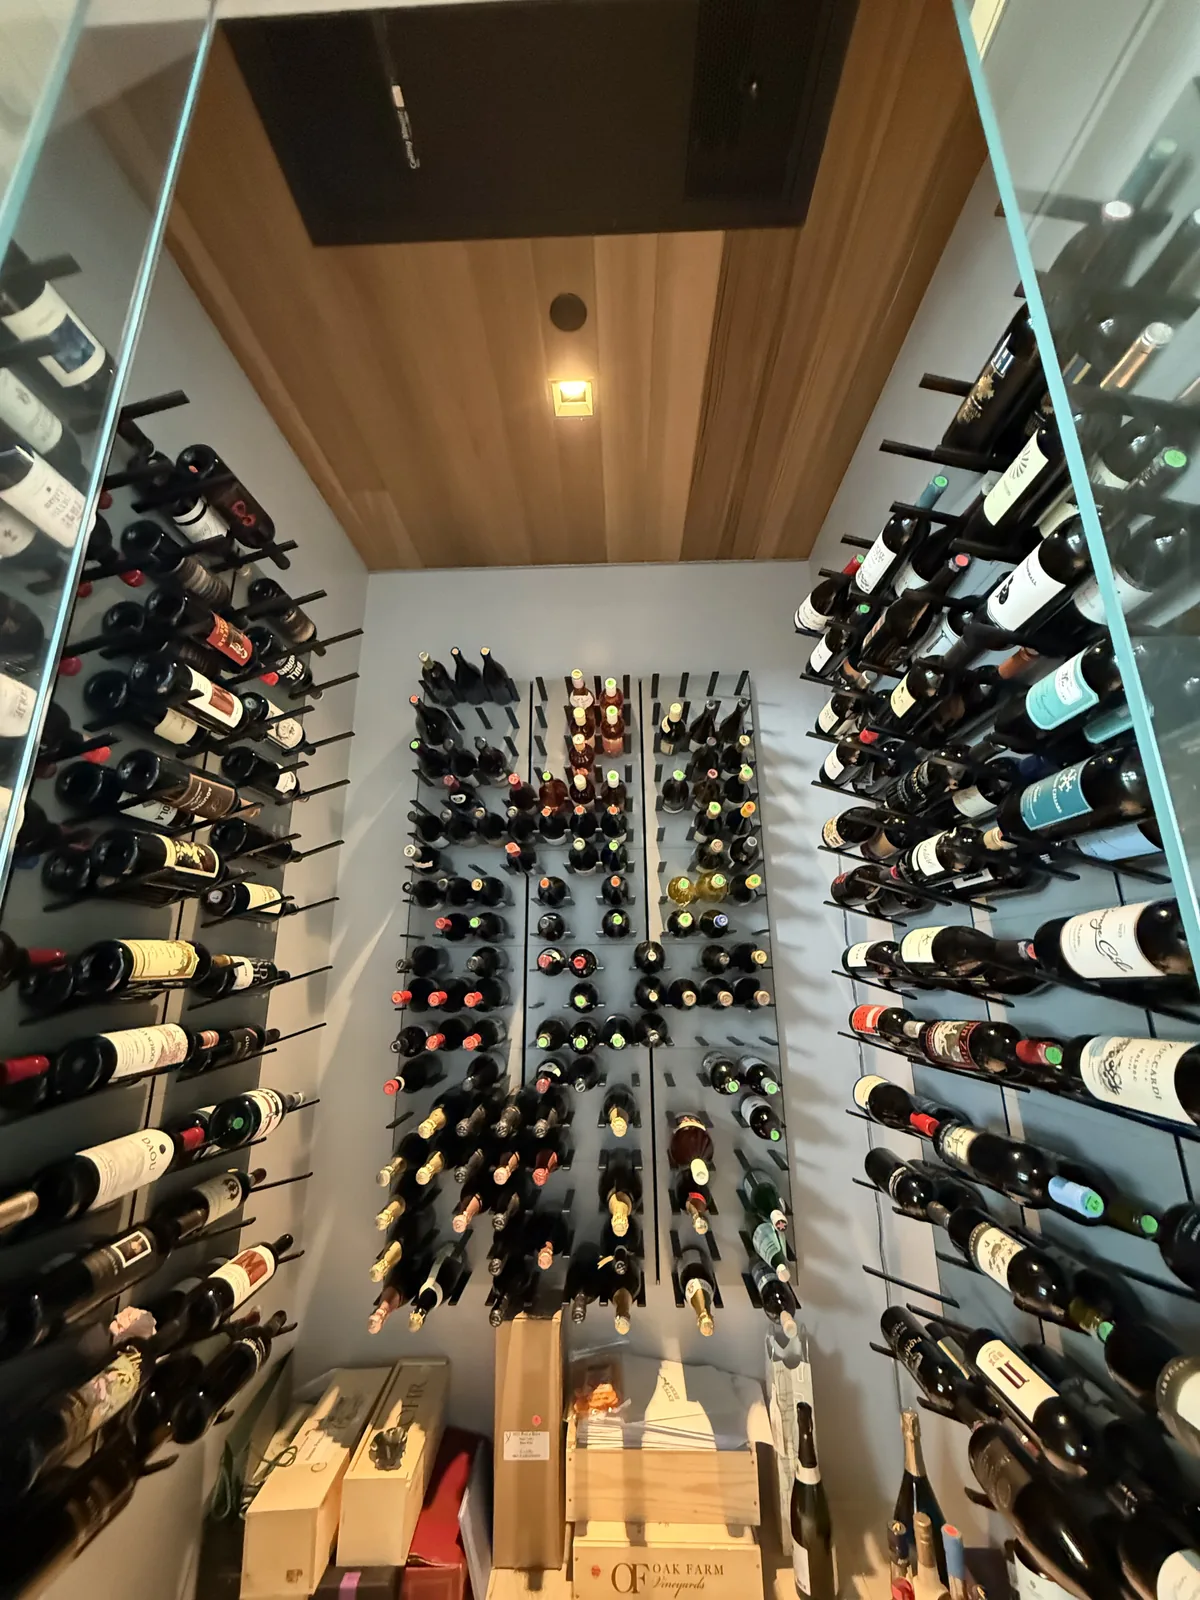
WhisperKOOL split, ceiling-mount, ducted, and self-contained systems are the workhorse of mid- to high-end residential wine cellars across Los Gatos, Saratoga, Atherton, Palo Alto, and the rest of the Bay Area. They’re built well — but like any refrigeration system, they wear, they leak, and they need real service from someone who knows the difference between “guess and check” and a proper diagnostic.
This article is a real-world walkthrough of a WhisperKOOL repair from the moment the homeowner picked up the phone, through the diagnostic, the parts replacement, the refrigerant work, and the final commissioning. If you’ve been searching for “WhisperKOOL repair near me” or “wine cellar not cooling” — this is what should happen, who should do it, and why the details matter for protecting your wine and your equipment.
When People Call Us About Their WhisperKOOL
Here’s what we usually hear when the phone rings. Any of these sound familiar?
Cellar warming up
Temperature has slowly climbed above setpoint over days or weeks. Unit is running but not keeping up.
Ice buildup or water leak
Visible frost on the evaporator, ice in the drain pan, or water leaking onto the cellar floor.
Unit won’t run at all
Display dark, fan not spinning, or compressor clicking on and off without cooling.
Loud or unusual noise
Buzzing, clicking, vibration, fan rattle, or a compressor that’s gotten noticeably louder.
Humidity drift
Cellar feels too dry (corks drying out) or too wet (label damage, mold). Either is bad for wine.
Annual service / tune-up
No problem yet — just want it checked, cleaned, and verified before something goes wrong.
Whatever the symptom, the diagnostic process is the same. Below is a real WhisperKOOL repair we just completed — a slow refrigerant leak that had drifted the cellar above its setpoint. We’re walking through the entire job because most homeowners have never seen what proper wine cellar cooling repair actually looks like.
Cellar Drifting Above Setpoint — Customer Could See It Happening
What the homeowner reported: WhisperKOOL ceiling-mount split system, about 9 years old. Outdoor condenser on a flat roof, indoor unit recessed directly into the ceiling of a 280-bottle cellar — supply and return both on the unit’s own grille face, no ductwork. Over about a week the cellar had drifted from its 55°F setpoint up several degrees. The unit was running continuously but not keeping up. No error codes, no warning, just losing temperature.
What that pattern usually means: Continuous run plus a slowly warming cellar plus no electrical fault is the classic signature of a low-charge condition. The system is running fine — it just doesn’t have enough refrigerant moving through it. The diagnostic question becomes where is it going, and the only acceptable way to answer that is to find the leak before doing anything else.
Find the Leak Before Touching Anything
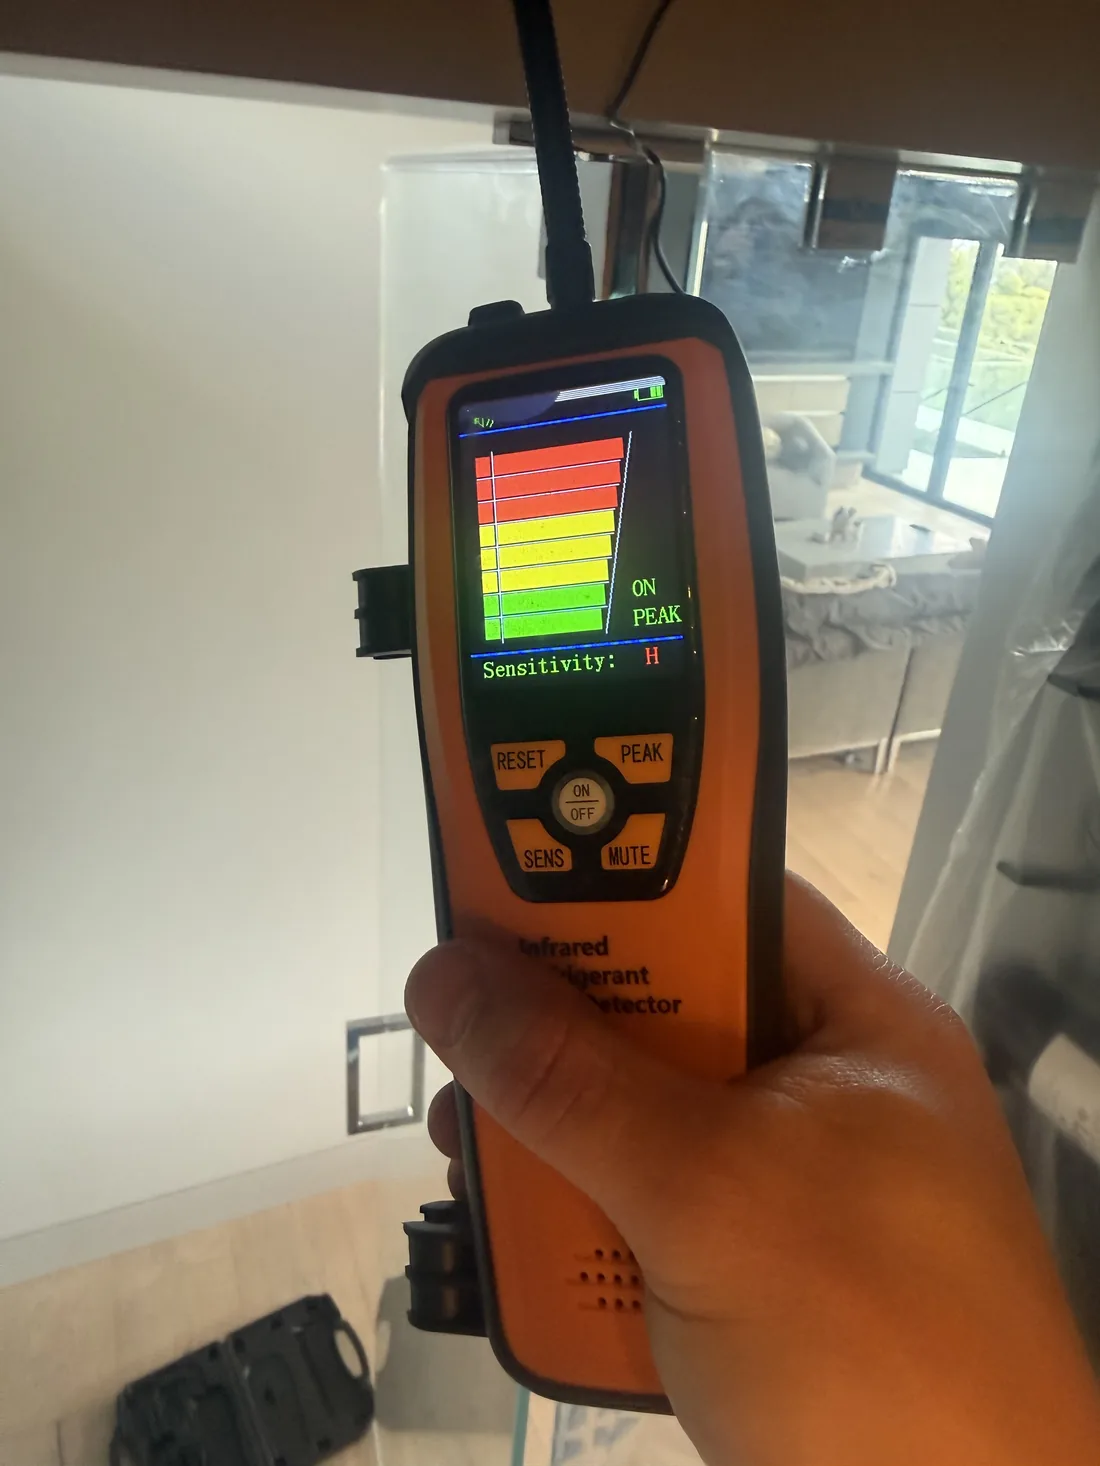
Before recovering refrigerant or pulling parts, we need to know where the system is losing its charge. Skipping the leak hunt and just topping the system off — which we sometimes hear about from customers who’ve had other techs out — guarantees the same call again in a few months, and it’s not legal under EPA regulations. The right move is to find the leak first, fix it once.
We swept the suspect zones with an electronic refrigerant detector at high sensitivity: flare connections at the rooftop condenser, brazed joints at the evaporator cabinet, the drain pan area, and the line set penetrations. The detector pegged red on PEAK directly at the evaporator coil — narrowing the leak source to within a foot or two.
Refrigerant systems carry a small amount of oil that circulates with the refrigerant — when there’s a leak, the oil migrates out alongside the gas and leaves a telltale stain. Pulling the inspection panel and looking at the drain pan corner gave us the visual confirmation:
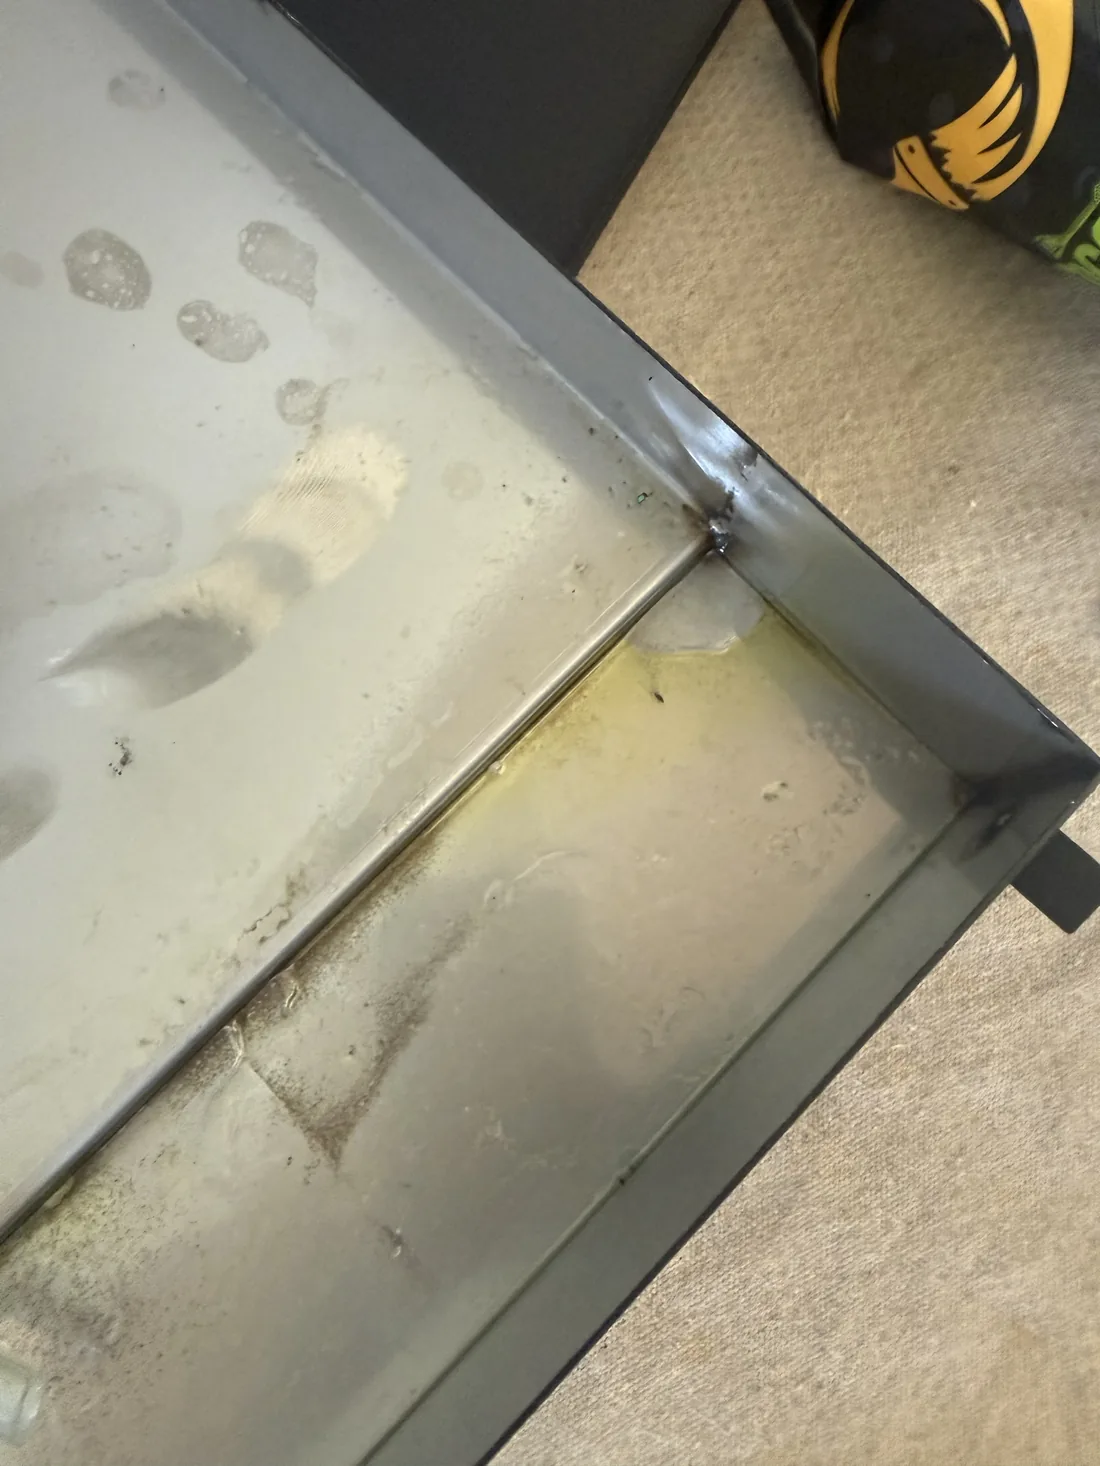
Wine cellar evaporators live in a humid environment by design — that’s how they pull moisture out of the cellar air. Over years of operation, condensate slowly corrodes the points where copper tubing meets the aluminum fin pack, eventually opening a pinhole. Once it starts, it never seals itself. The only correct fix is replacing the coil — and replacing the matching components alongside it so the system goes back to factory condition.
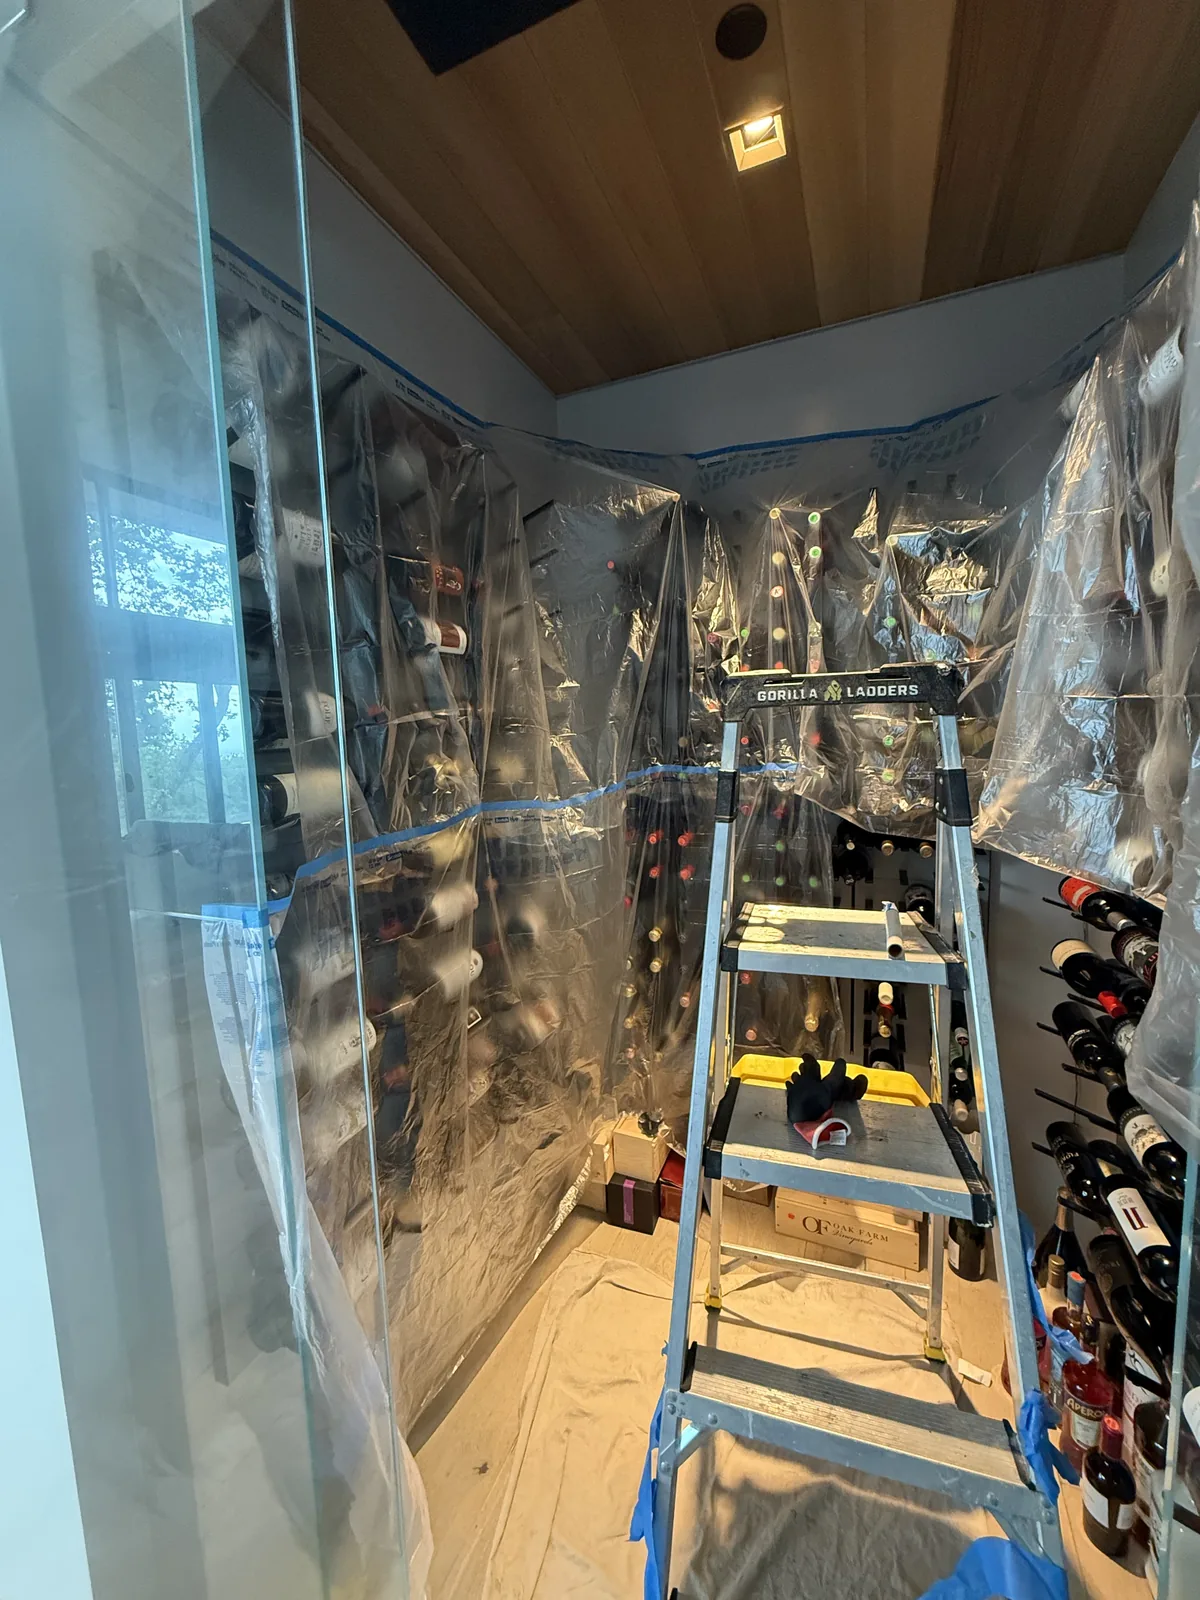
Cover the Collection Before Any Work Starts
This is one of the things that separates wine-cellar-trained refrigeration techs from generic HVAC repair. Once we open up the evaporator cabinet, dust, brazing residue, and small bits of insulation can fall onto whatever’s below. In a wine cellar that means racks of bottles — and bottles your customer cares about. Before any tools come out, the racks get covered with clean plastic sheeting, taped at the top to the wall, so nothing reaches the labels, capsules, or shelving.
Same for the cellar floor, which usually has hardwood or tile that can scratch. Drop cloths go down across the entire work area. The whole time we’re inside the cellar, we treat it the way a high-end builder treats a client’s living room — protect first, work clean, leave it the way we found it.
It takes us 20 to 30 minutes at the start of every wine cellar repair. We’ve never had a customer complain about the time. We’ve also never returned a bottle with a brazing-flux smudge on the label — and that’s not a coincidence.
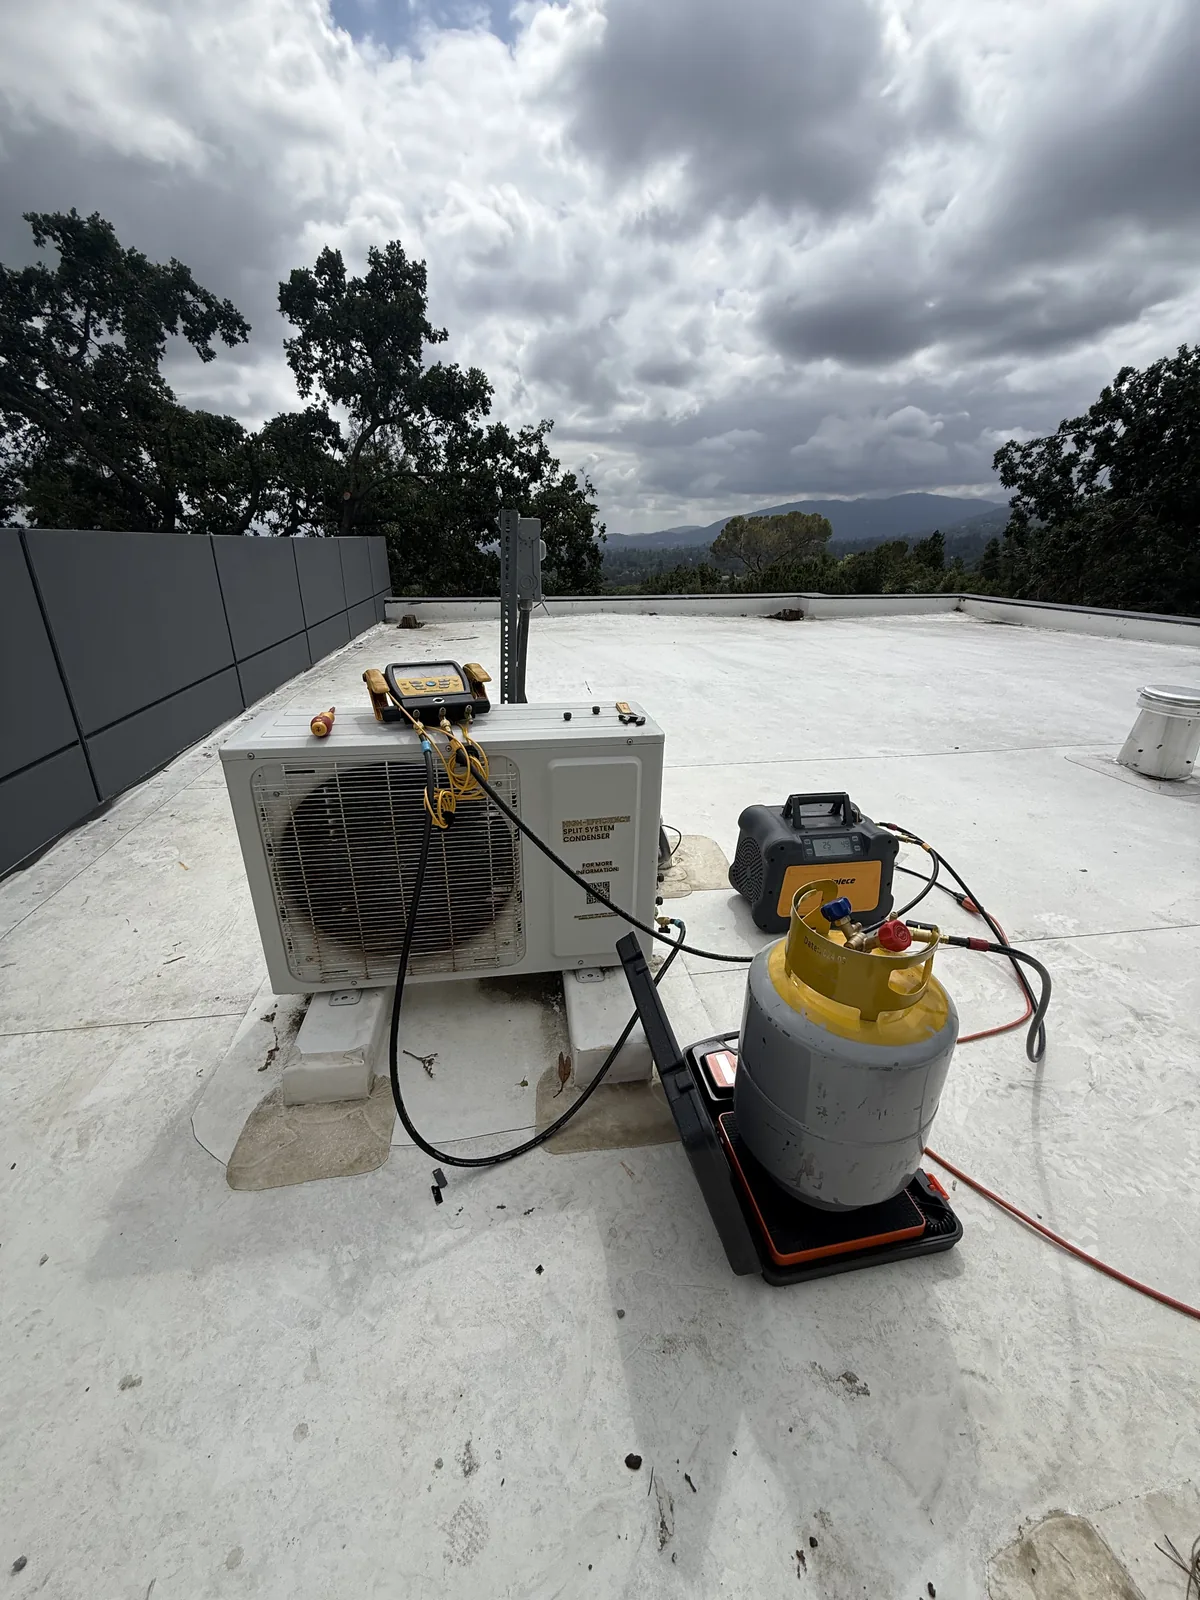
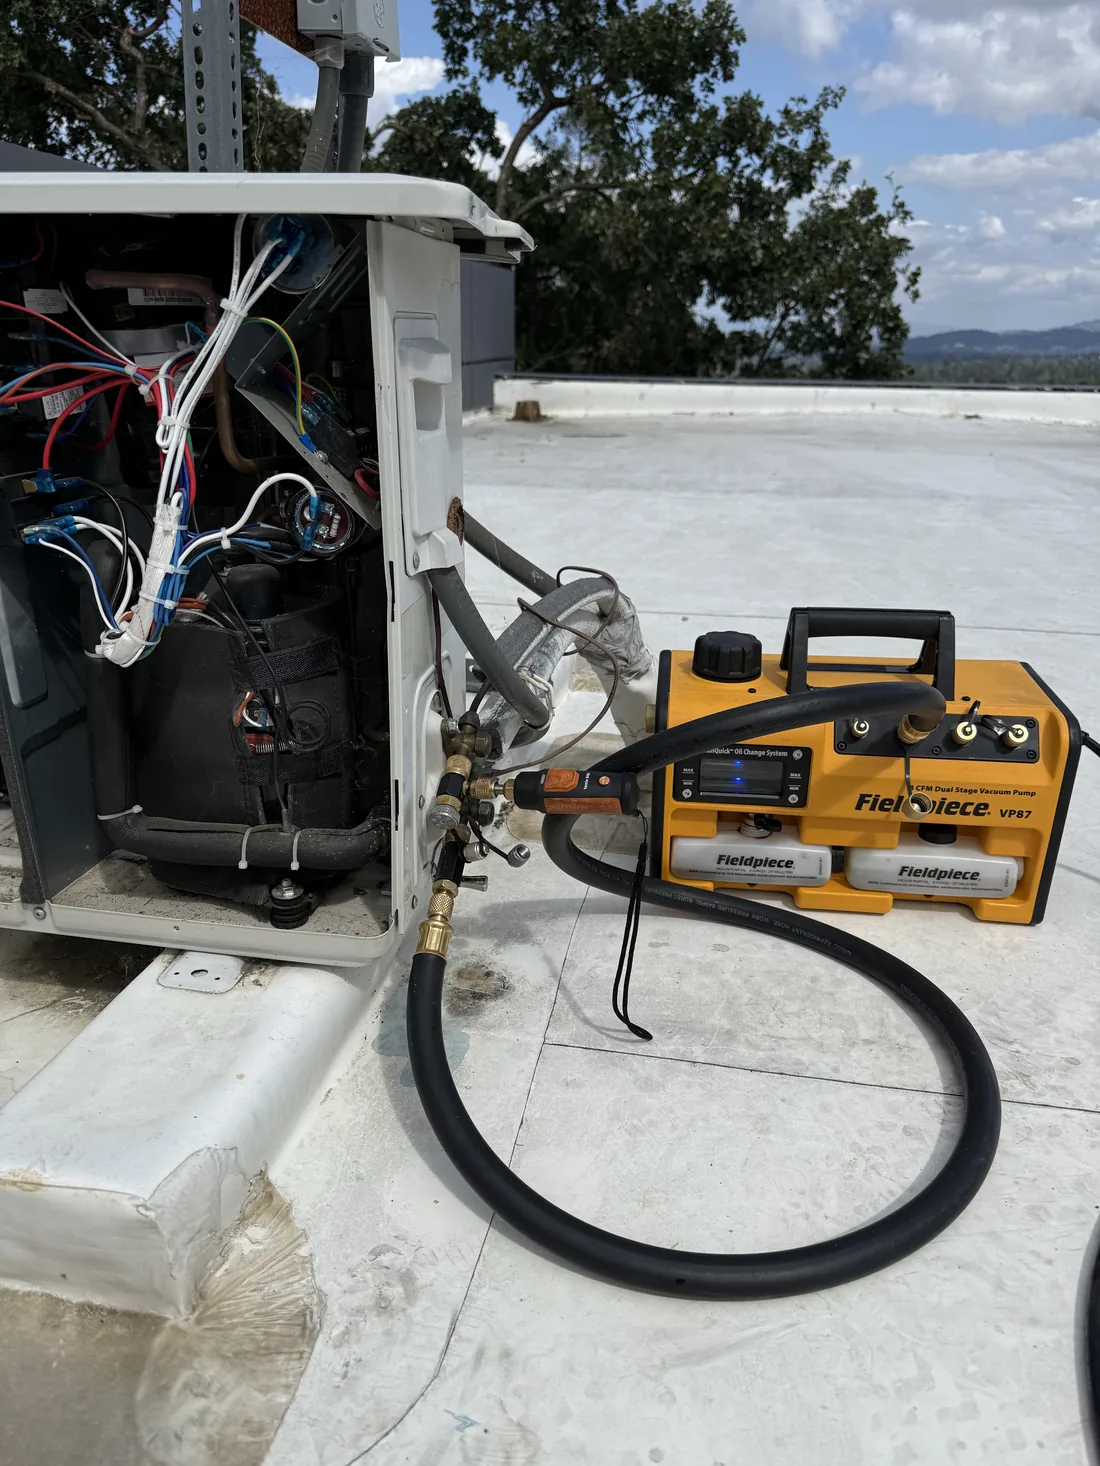
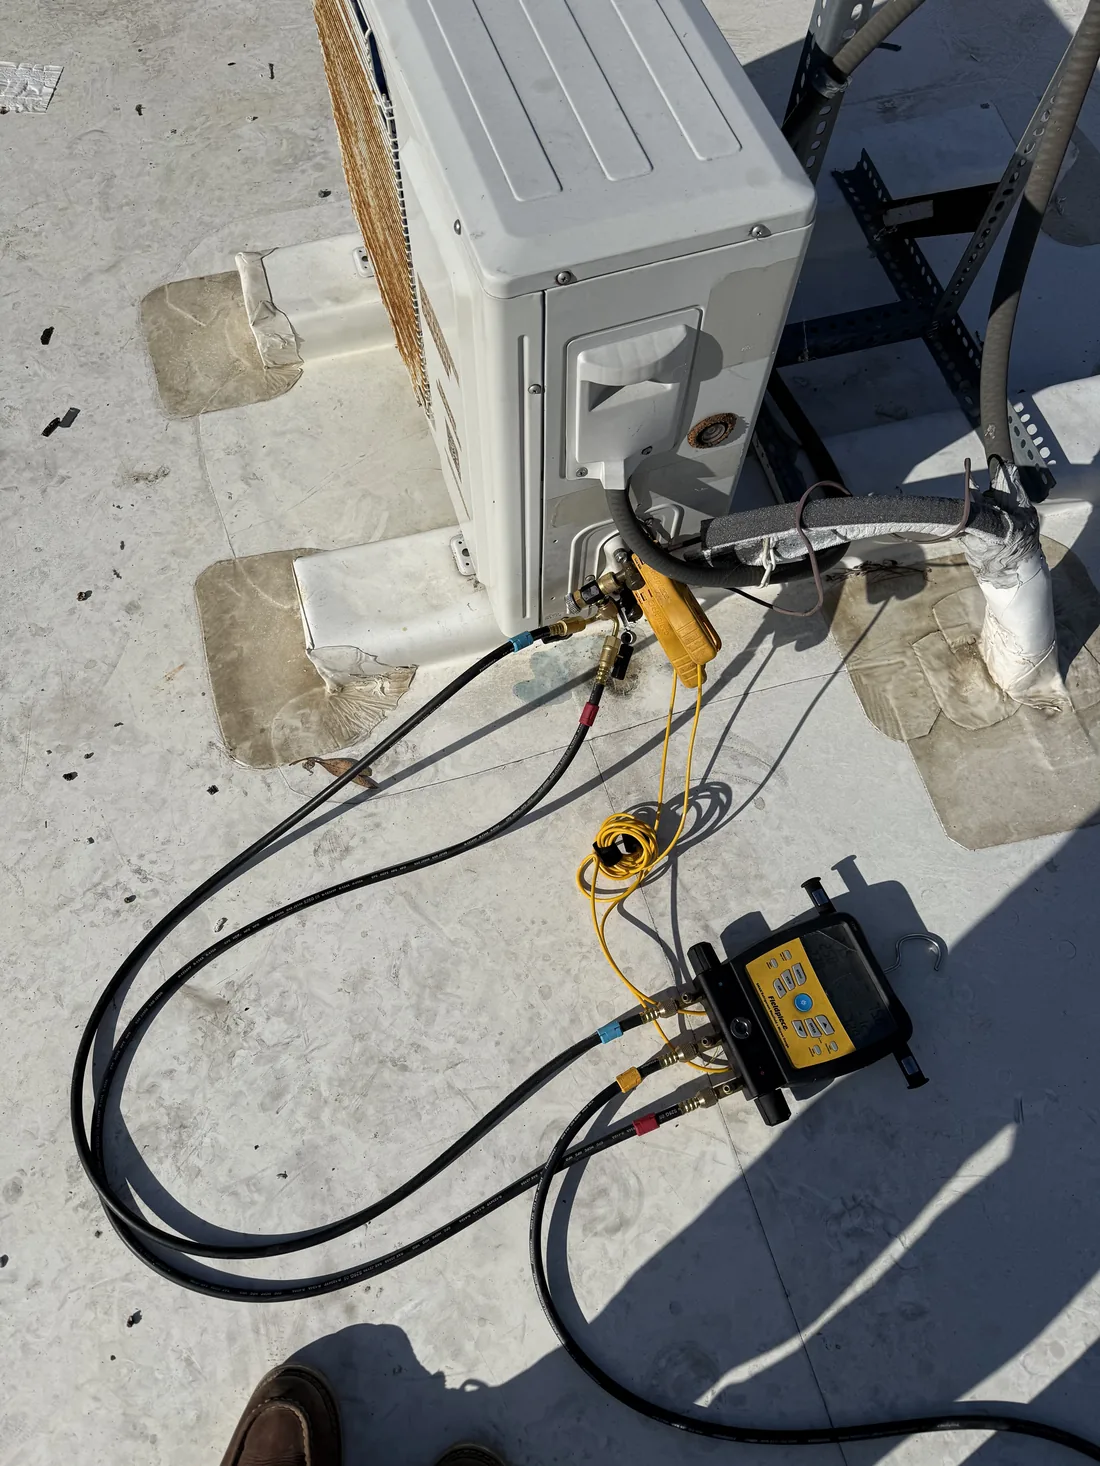
Recover the Refrigerant — EPA Compliant
Federal law (EPA Section 608) requires that refrigerant be recovered into a certified cylinder before any sealed-system work — venting it to atmosphere is illegal and fineable. We connect a recovery machine to the high and low service ports on the rooftop condenser and pull the system into a deep vacuum until the recovery cylinder shows no further weight gain. Recovery time, weight, and cylinder ID all get logged on the work order.
This step isn’t just a regulatory checkbox. It’s also the cleanest way to remove all the contaminated refrigerant before we open up the system. Once the system is at zero pressure we can safely cut into the brazing without a refrigerant blowback.
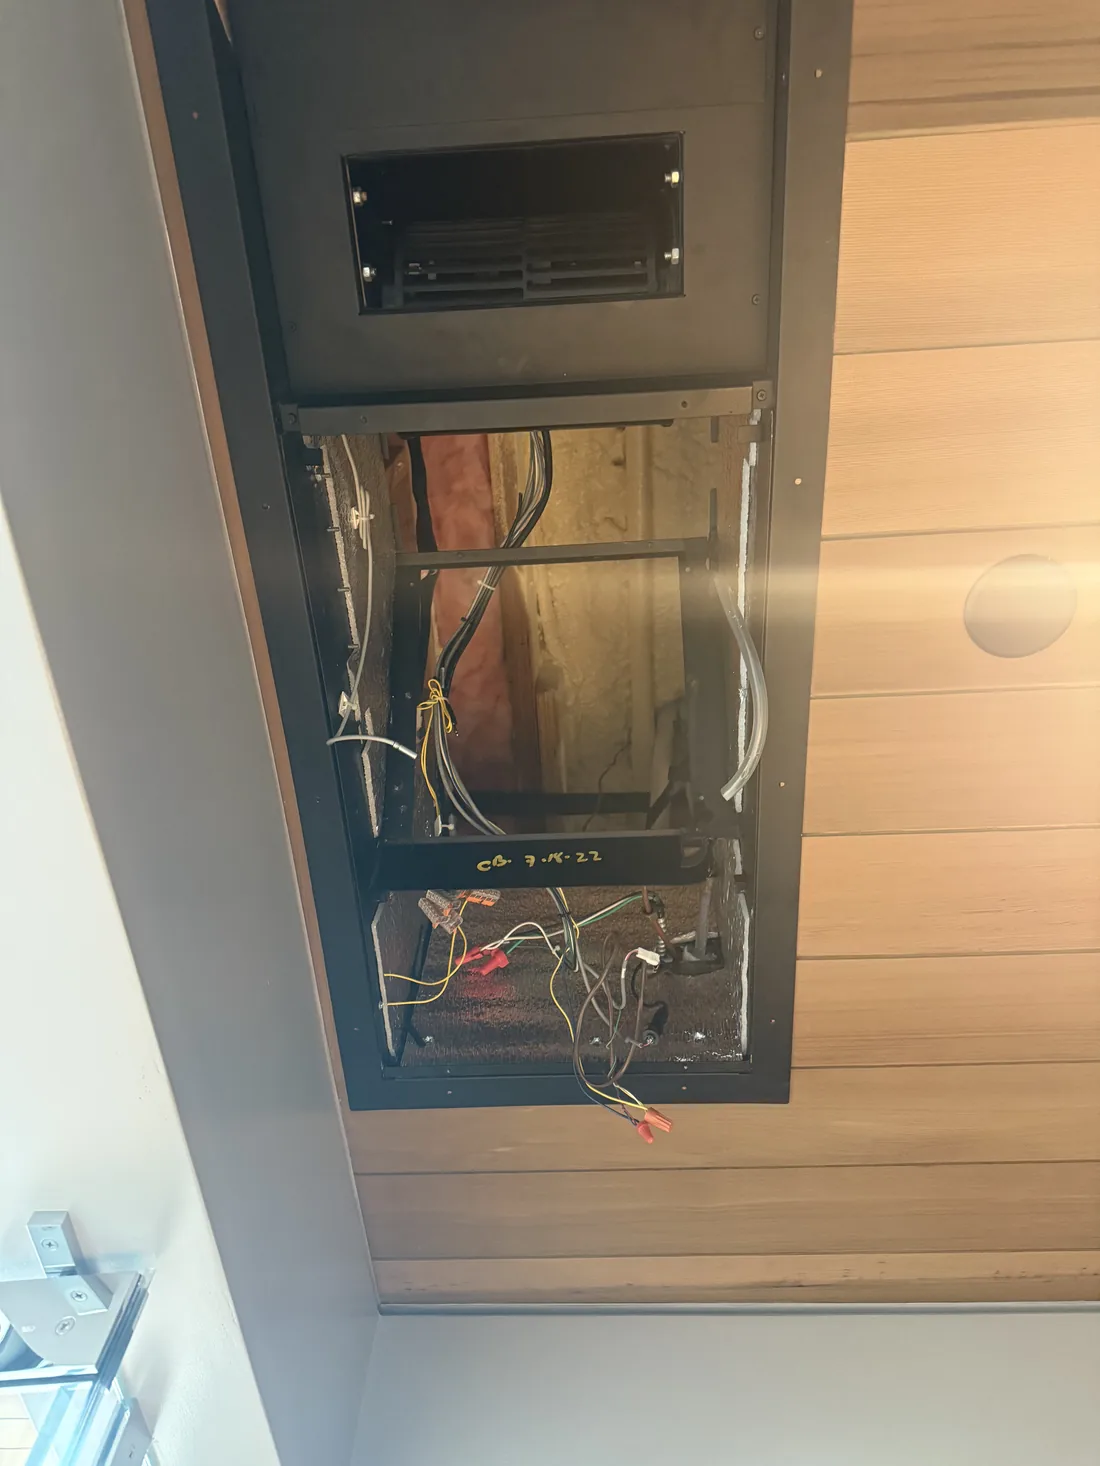
Open the Evaporator Cabinet Carefully
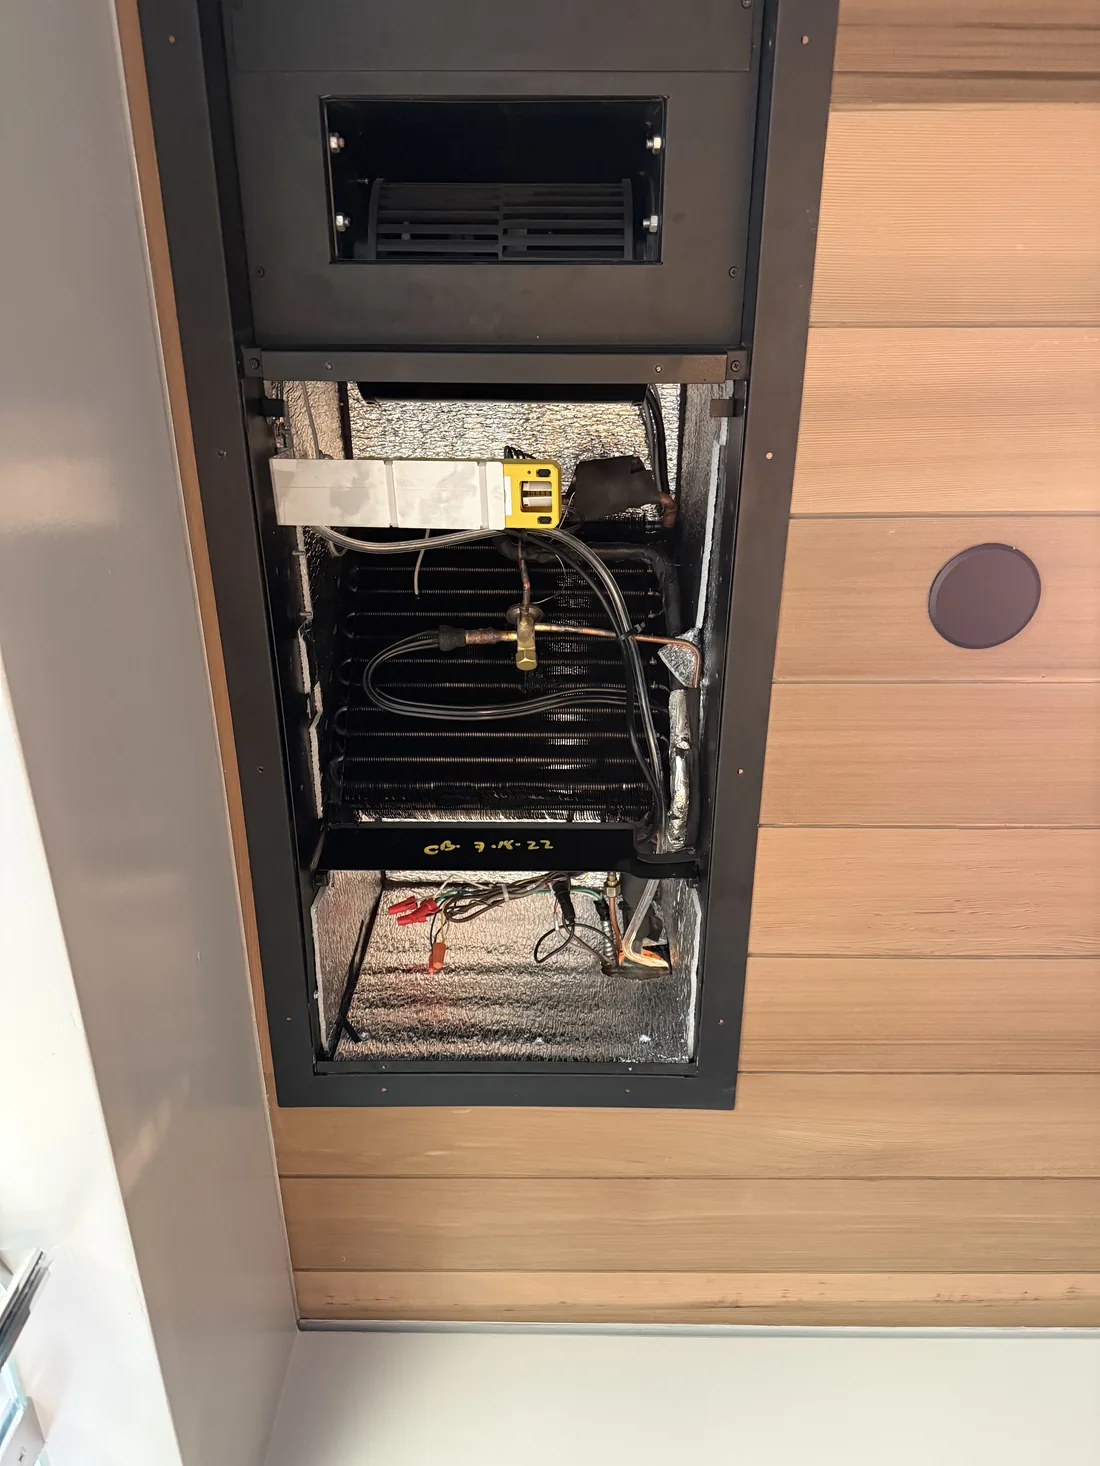
This is where ceiling-mount WhisperKOOL installs get tight. The indoor unit is recessed directly into the cellar ceiling — the cabinet body lives in the soffit above, but the only access is through an inspection panel that drops down from the cellar side. Everything that comes out — blower, evaporator coil, drain pan, TXV, electrical compartment — has to come out through that single opening. There’s no second way in.
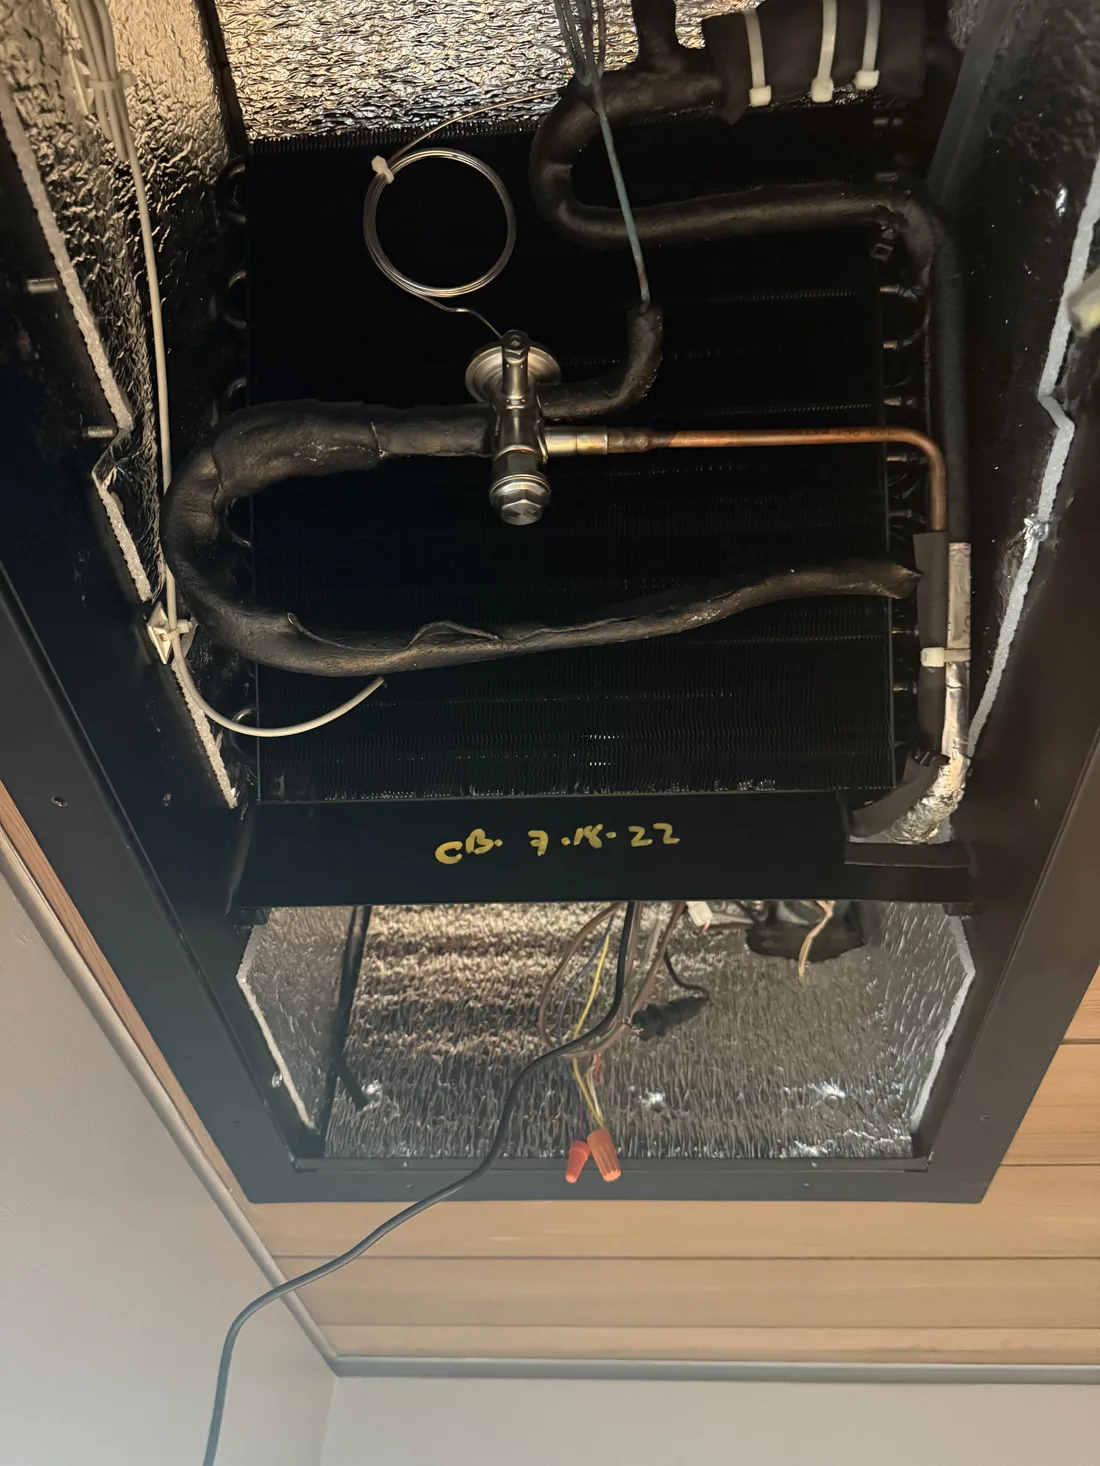
With the panel removed you can see the layout: blower at the top, evaporator coil in the middle, electrical and drain plumbing at the bottom. The TXV (thermostatic expansion valve) sits at the inlet of the coil with its sensing bulb strapped to the suction line.
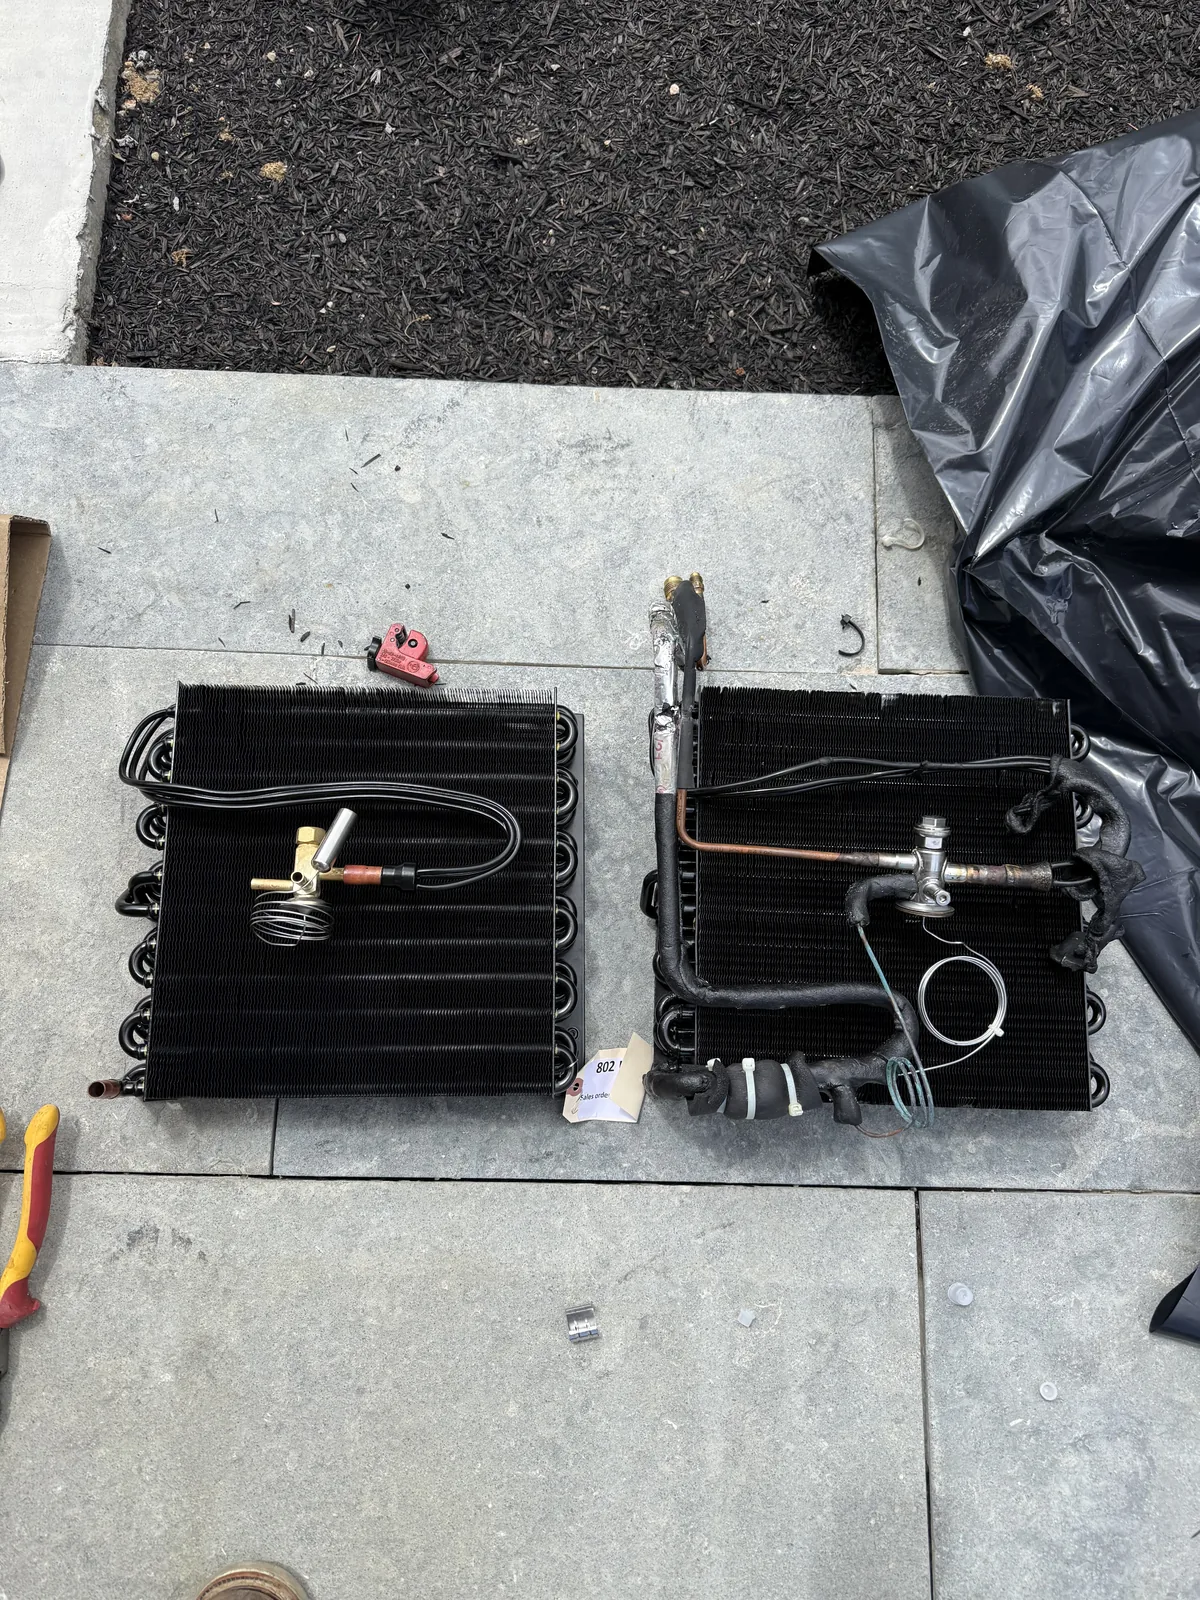
New Coil, New TXV, New Drier — Plus an Upgraded Drain Pump
Out comes the old coil, in goes the OEM replacement — same circuiting, same connection geometry, drop-in fit. Both items get nitrogen-purged during brazing: dry nitrogen flows through the tubing while we solder so no oxide scale forms inside the copper. Skip the nitrogen and that scale flakes off later, washes through the system, and clogs the new TXV within weeks. It’s the kind of detail that doesn’t show on the invoice but defines whether the repair holds for ten years or ten weeks.
The third part swapped out every time a sealed system is opened: the filter drier. Once a system has been exposed to atmosphere the existing drier is saturated with moisture and contaminants and won’t protect the new components. A fresh liquid-line drier installed in the correct flow direction is mandatory — not optional. Cheap part, expensive omission.
While the cabinet was open, we also upgraded the drain pump. The original was still working, but on a unit this age it’s only a matter of time before it sticks or fails — and a failed drain pump on a wine cellar means standing water in the pan, which becomes a leak into the floor below. We replaced it with an improved-design pump now, while access is already open and we’re already on-site. Doing it later as a separate visit would cost the customer another full diagnostic and another labor charge for the same disassembly. Same logic as the TXV: the right time to upgrade is when access is already there.
Verify Tightness, then Pull a Deep Vacuum
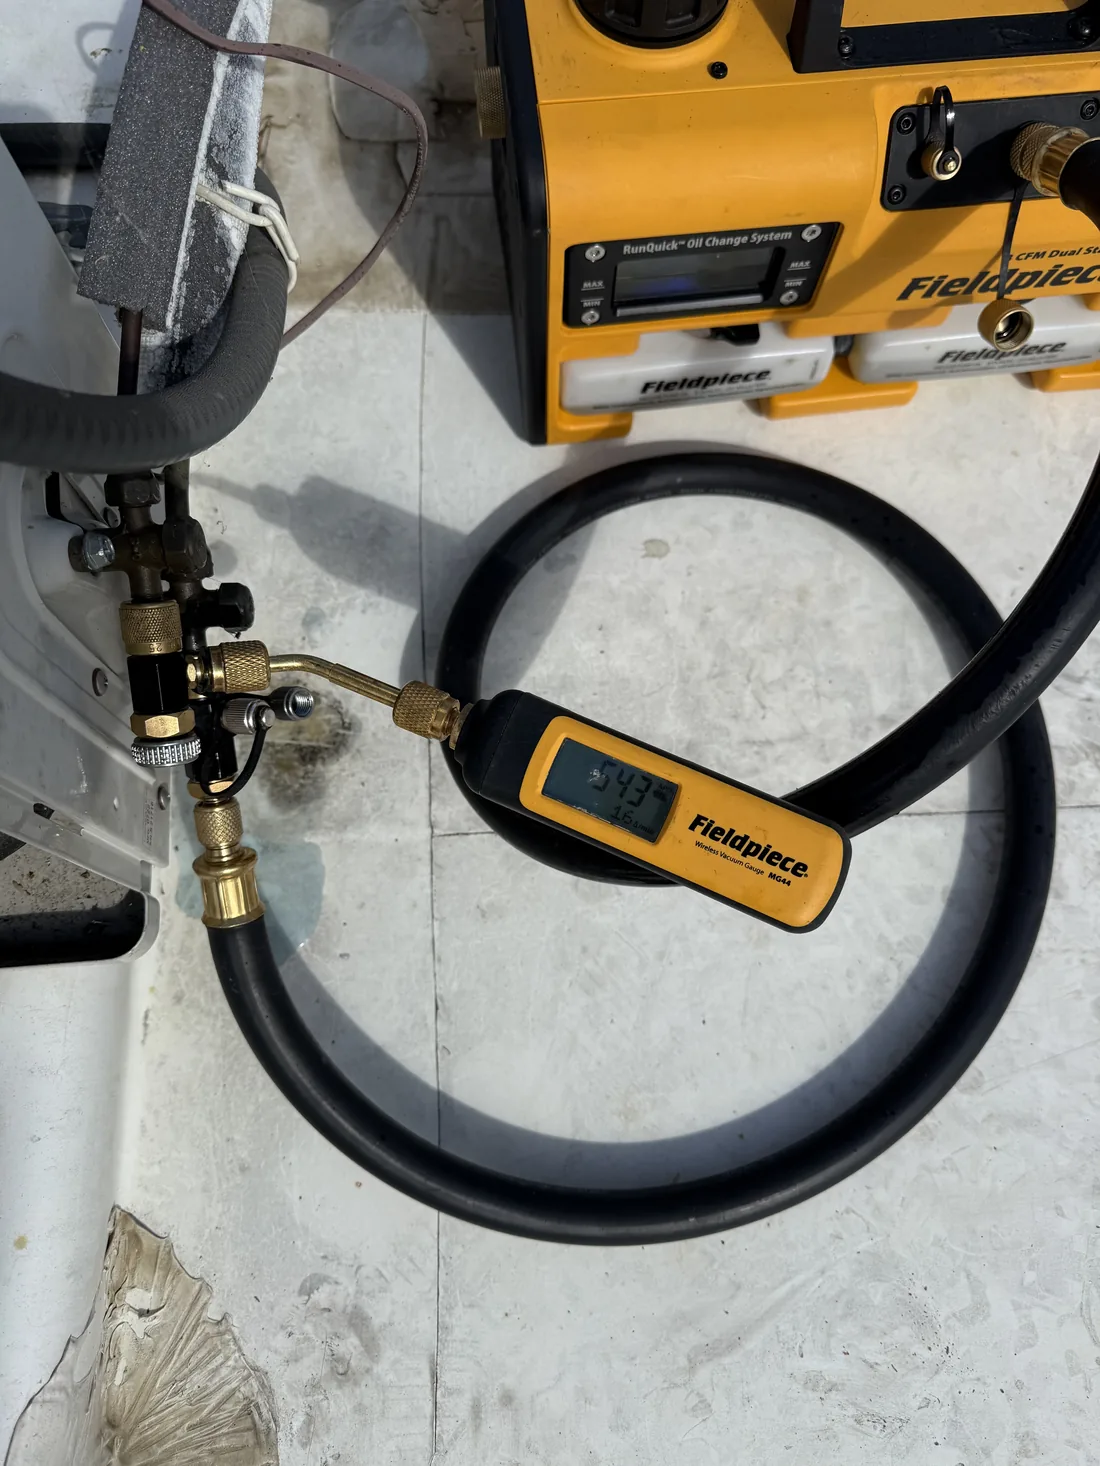
Before letting any refrigerant back into the system we pressure-test with dry nitrogen and watch a digital gauge for any drop. Zero drop = no leaks at the new brazed joints. Any drop, no matter how small, gets traced and re-brazed before we move on. This is the single most-skipped step on bad refrigeration repairs and the single biggest cause of “the repair didn’t last.”
Once the system holds nitrogen, we recover that nitrogen and pull a deep vacuum with a two-stage pump. The vacuum has two jobs: removing every trace of moisture from the system (water and refrigerant don’t mix — moisture turns into acid inside a running compressor), and proving the system is mechanically tight. We use a digital micron gauge isolated from the pump to verify the vacuum holds steady. We don’t proceed to charging until those numbers are right where the manufacturer wants them.
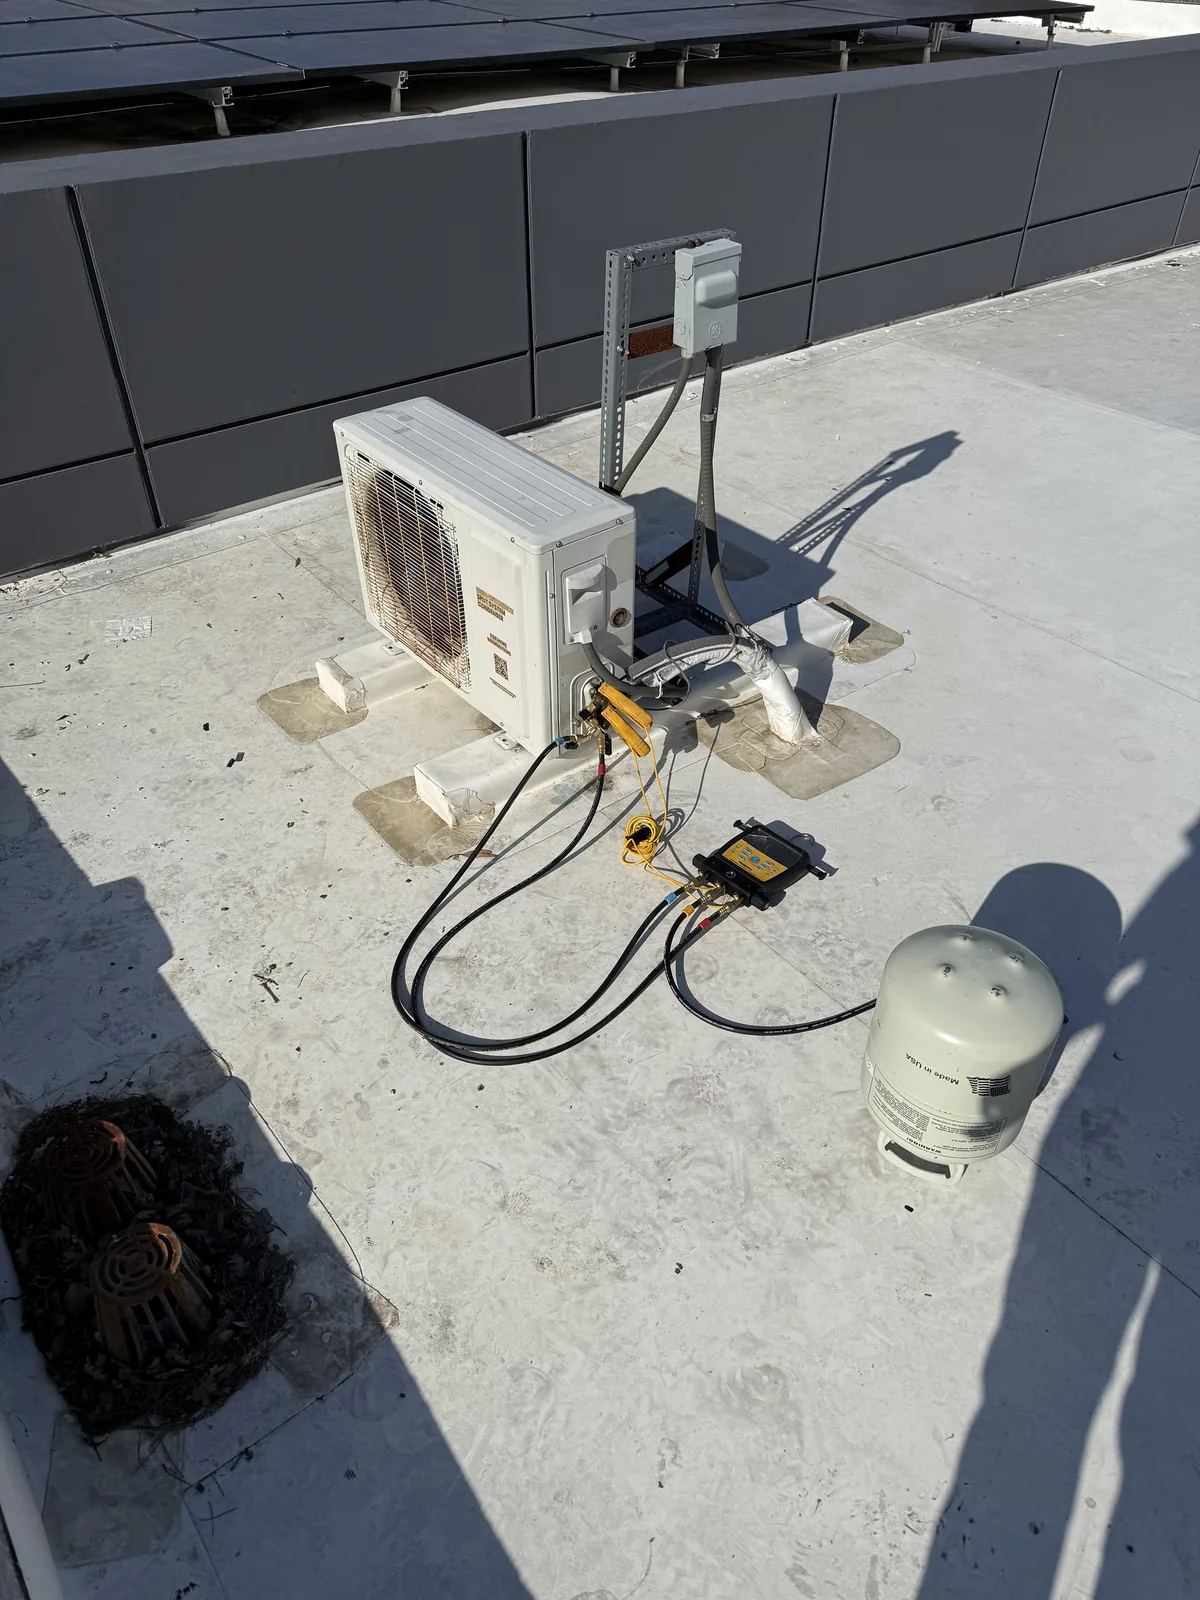
Charged by Weight — Per WhisperKOOL Factory Spec
WhisperKOOL specifies the factory refrigerant charge by weight on the data plate of every unit. We charge to that exact spec using a digital refrigerant scale — not “by feel” using gauge pressures alone. The weighted approach is repeatable in any ambient condition; the gauge-only approach gives results that are close-enough on a 90°F day and wrong on a 65°F day. We do it the way the manufacturer says.
The cylinder sits on the scale, we tare it, open the valve, and let liquid refrigerant feed into the system through the manifold while the unit runs. The scale counts down to the target weight; we close the valve and let the system equalize before the final tuning step.
Verify Superheat & Subcooling — Within Manufacturer Range
With the factory weight in, the unit runs and we measure two things: superheat at the suction line near the evaporator outlet, and subcooling at the liquid line near the condenser outlet. WhisperKOOL publishes acceptable ranges for both — and a properly working system, properly charged, will land inside those ranges. If it doesn’t, something else is wrong and we keep diagnosing. We don’t leave a system that’s outside spec.
This unit landed inside the manufacturer’s window on the first measurement after the factory weight charge — meaning the new coil and TXV are working together correctly and the charge is right. Nothing further needed adjusting.
Pull Down, Final Walk-Through, Documentation
Commissioning is more than “does it cool.” We verify airflow at the supply grille (it should match what the unit’s blower curve calls for), check drain flow (no standing water, slope toward the drain), verify electrical draw at the compressor is within nameplate, and watch how the cellar pulls down to setpoint and how the unit cycles when it gets there. Humidity should sit in the right band — neither bone-dry nor swampy.
Everything that gets measured goes into the customer’s service file along with the recovered refrigerant weight, the new charge weight, photos before and after, and the part numbers we installed. Anyone — us, another contractor down the road, or the homeowner — can pull that file and see exactly what was done.
What We Replace on a Coil-Leak Repair
For a confirmed evaporator leak on a WhisperKOOL split system, the standard scope of work — done correctly, the way the manufacturer would do it themselves — covers all of the following:
- OEM replacement evaporator coil — direct-fit, factory-spec circuiting
- New TXV (thermostatic expansion valve) — matched to the coil and refrigerant
- New filter drier — installed in the correct flow direction on the liquid line
- Upgraded drain pump when applicable — replaced proactively while access is open, before it fails on its own
- Nitrogen-purged brazing on every new joint to prevent internal oxide formation
- Pressure test with dry nitrogen to verify zero leaks at all new connections
- Deep vacuum to manufacturer’s specification, verified with a calibrated micron gauge
- Refrigerant charge by weight per the WhisperKOOL data plate, using a digital scale
- Superheat & subcooling tuning within the manufacturer’s published range
- Full commissioning with documented airflow, electrical draw, and cycling behavior
Anything less than this list — for example, replacing only the coil and reusing the old TXV, or skipping the pressure test, or charging “by feel” instead of by weight — is a repair that will probably last a year or two before something else fails. The customer pays twice. We don’t work that way.
We Stand Behind Every Repair
1-Year Workmanship Warranty + OEM Manufacturer Warranty on Parts
- Full year of coverage on labor and workmanship
- OEM parts warranty from WhisperKOOL on replacement components
- Documented service file — readings, photos, part numbers
- Free callback if anything we touched needs adjustment
- Written quote before any repair work begins
- Licensed and insured — your home, your collection, both protected
Who Should Service Your WhisperKOOL
Wine cellar cooling sits at the intersection of HVAC and commercial refrigeration. Most residential HVAC techs don’t carry the C-38 refrigeration license, don’t have the right charging equipment, and have never opened a wine cellar evaporator before. That’s not a knock on them — they’re not trained for it, and they shouldn’t be improvising on equipment that’s protecting a wine collection. Here’s what to look for.
Direct training and parts access from the manufacturer. We work on these systems every week, not occasionally.
Federal certification required to legally handle refrigerants. Recovery and recharge work documented per Section 608 rules.
Both the HVAC license (C-20) and the dedicated Refrigeration license (C-38). Most contractors only have one. CSLB #1127709.
Every job recorded with readings, photos, and part numbers. You get a full file at the end — and so do we for next time.
WhisperKOOL Authorized — and we also service CellarPro, Wine Guardian, KoolR, Breezaire, US Cellar Systems. Same standards across all of them.
Air Conditioning Contractors of America member. BBB Accredited Business. Professional standards we hold ourselves to.
WhisperKOOL Repair — Common Questions
Let’s get it back to setpoint.
WhisperKOOL Authorized · EPA 608 Certified · Real diagnostics, factory-spec repairs, full 1-year warranty. Serving Santa Clara, San Mateo & Santa Cruz counties.